在服务发现的基础上,实现七层负载均衡或者根据业务逻辑的服务在均衡,Kubernetes 中的 Service 是无法实现的,Linux 的 Kernel 也无法实现。这种情况下,需要一种功能更加强大和全面的服务治理能力,也就是服务网格,常用的框架是 Istio、Linkerd。
微服务架构的演变 Evolution 单机时代 :单机部署,多服务融合在一起,人肉运维,价格昂贵
微服务时代 :应用服务切割开,相互隔离,成为微服务。系统复杂度上升,好处是每个子系统是可控和可管理。
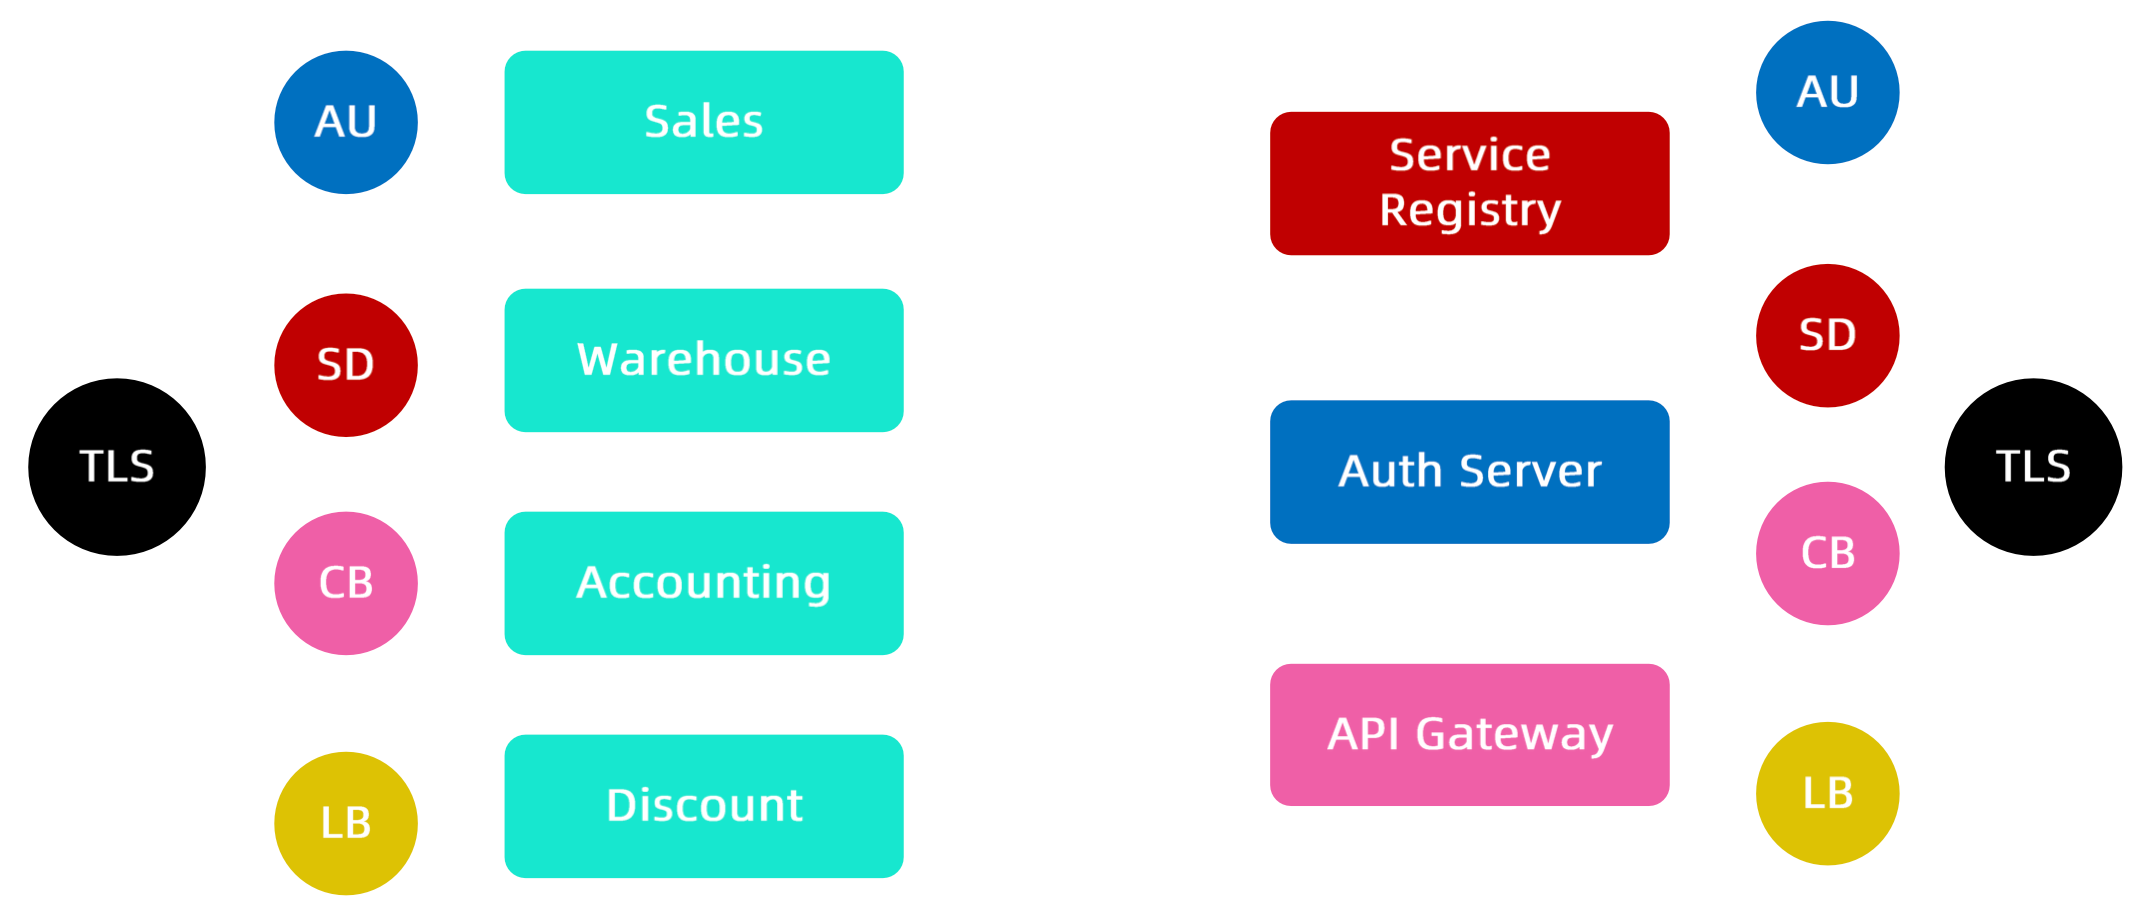
从单块系统到微服务系统的演进 Monolith,单体应用阶段,一个购物系统需要具备的模块:销售模块、仓储模块、计费模块、促销折扣模块。
对于客户端而言,访问的都是一个服务。
根据高内聚,松耦合、避免过度设计的原则,将单体架构拆分为微服务架构。每一个子系统有独立的生命周期,可以独立部署,根据子系统的压力和重要性,可以冗余部署。
微服务架构的演进
对于用户而言,只需要与 API 网关通信,不需要直接访问后端具体服务。
典型的微服务业务场景
当出现服务异常或者网络出现问题时,局部出现故障,如果有冗余的能力,通过服务发现和负载均衡转移可以解决,如果问题更加严重。而为了不影响扩散到全局,一般会通过熔断、降级的功能。
更完整的微服务架构
在微服务中,服务和服务之间可能会相互调用,各个服务都具有熔断、冗余容错、负载均衡、安全认证的能力,这个系统就会更加完整。
系统边界
将平台侧的能力和业务侧的能力分开,将专注点明确化。为了实现这个点,则需要引入 Service Mesh。
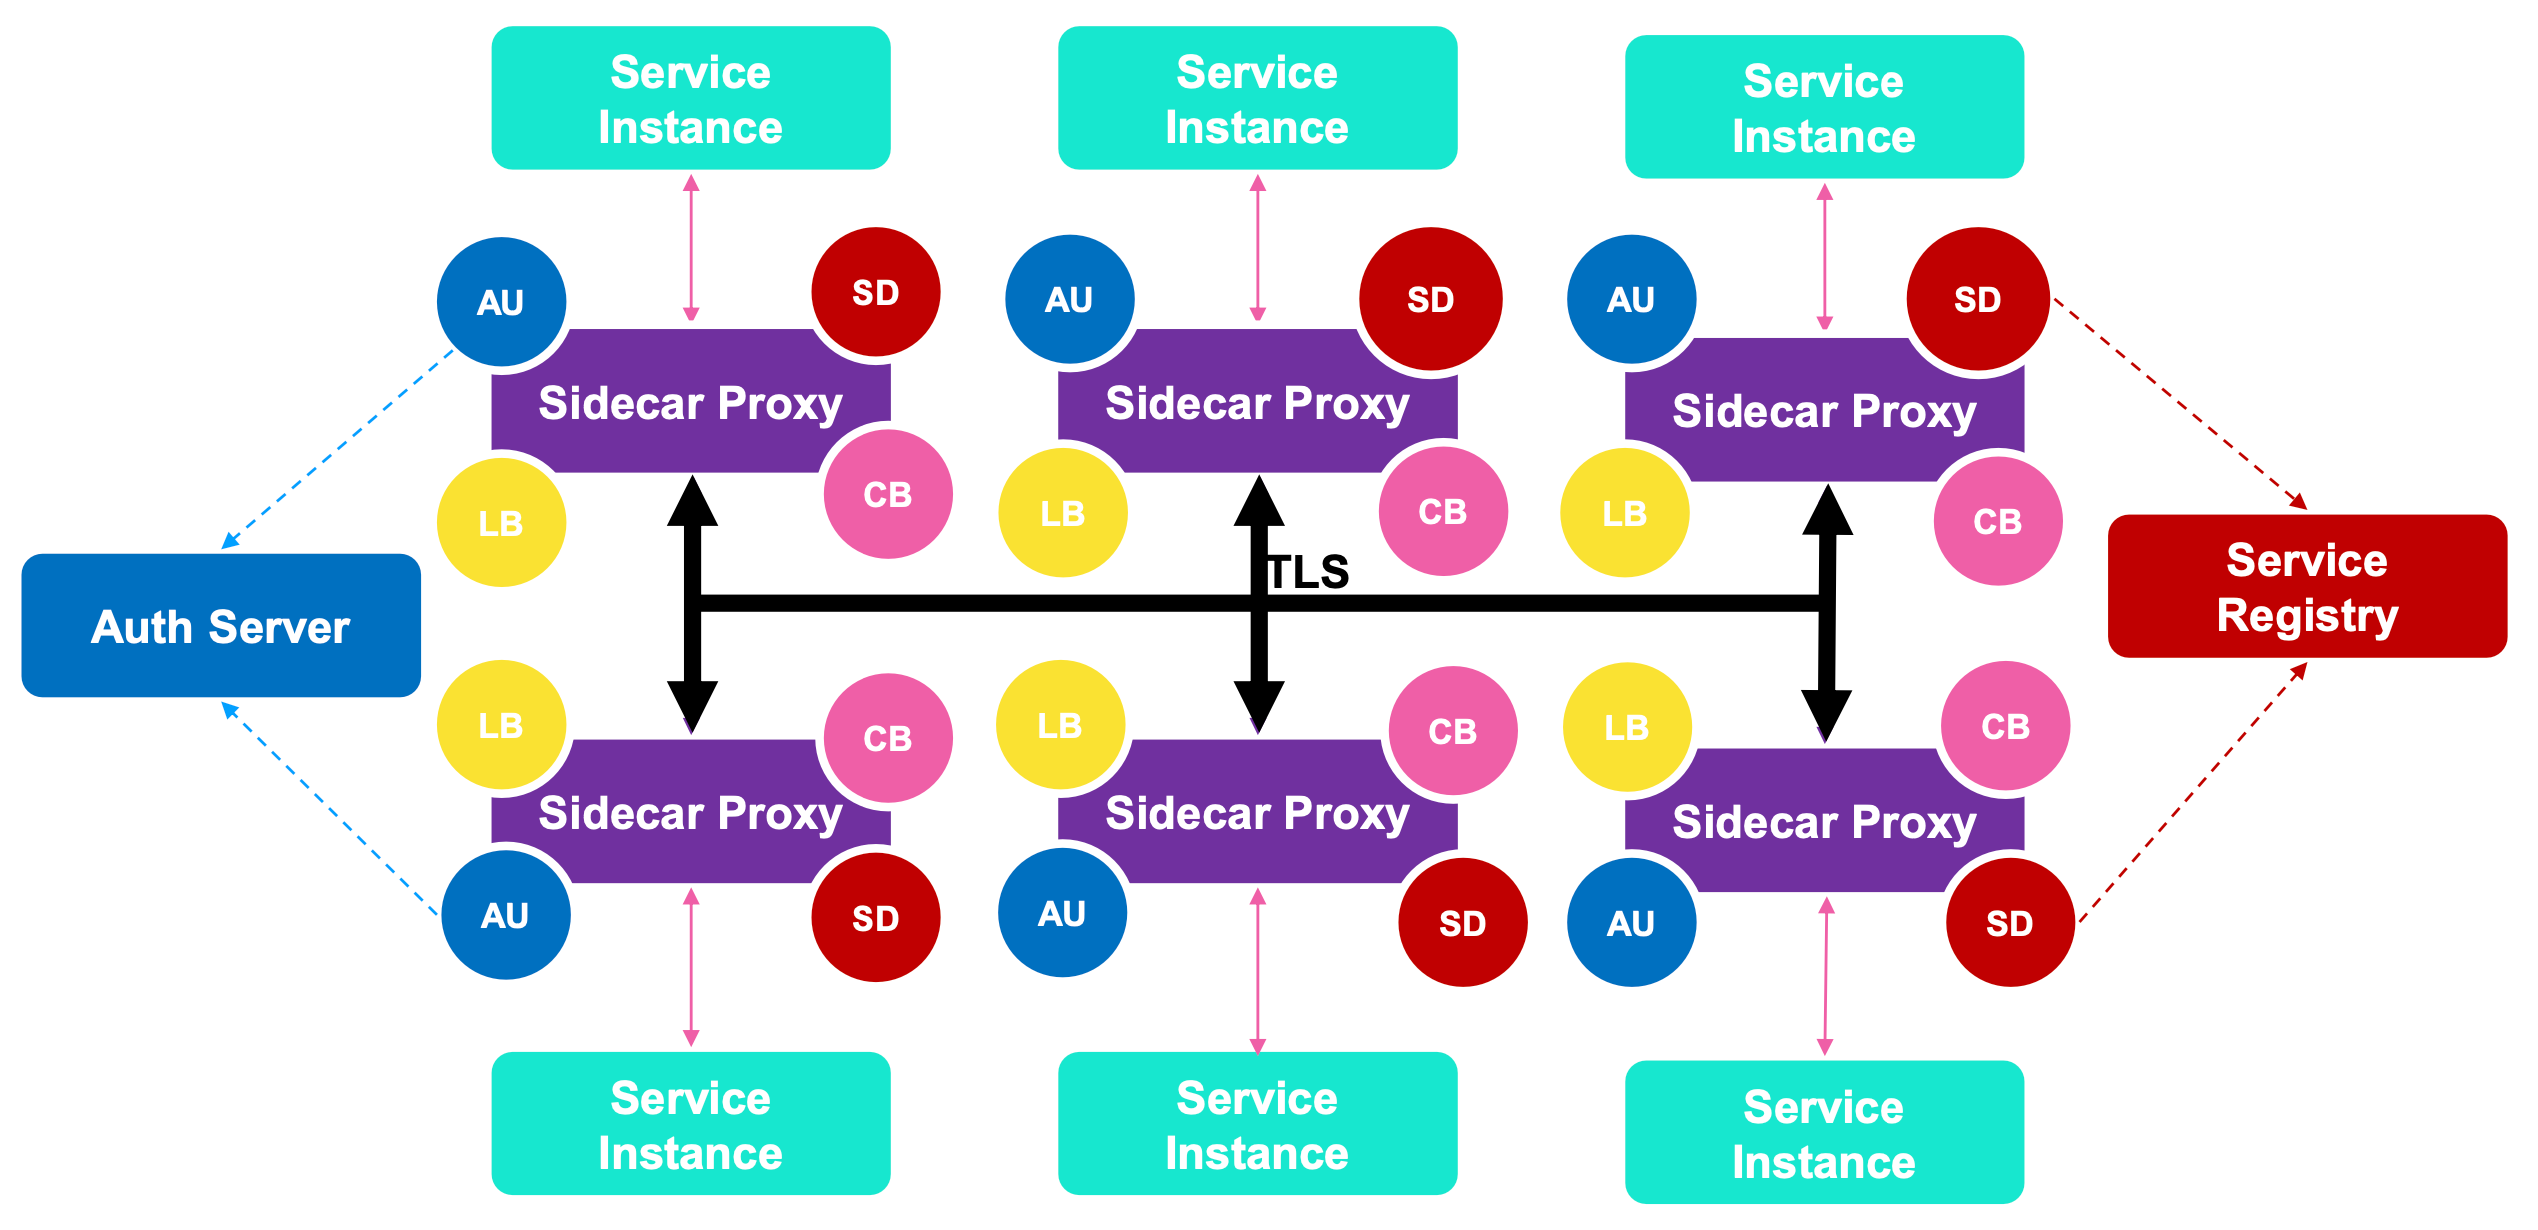
微服务到服务网格还缺什么 Sidecar 的工作原理
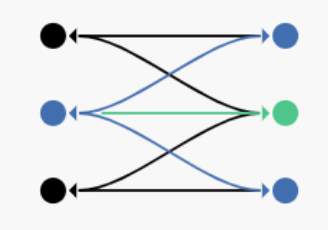
在每一个服务的容器中插入一个 Sidecar,服务和服务之间不直连交互,而是通过与 Sidecar 交互实现。
将每个服务都需要使用的服务发现、负载均衡、认证鉴权、协议升级(服务专注功能,明文交互,由 Sidecar 转译加密)、熔断能力,都封装到 Sidecar 中。
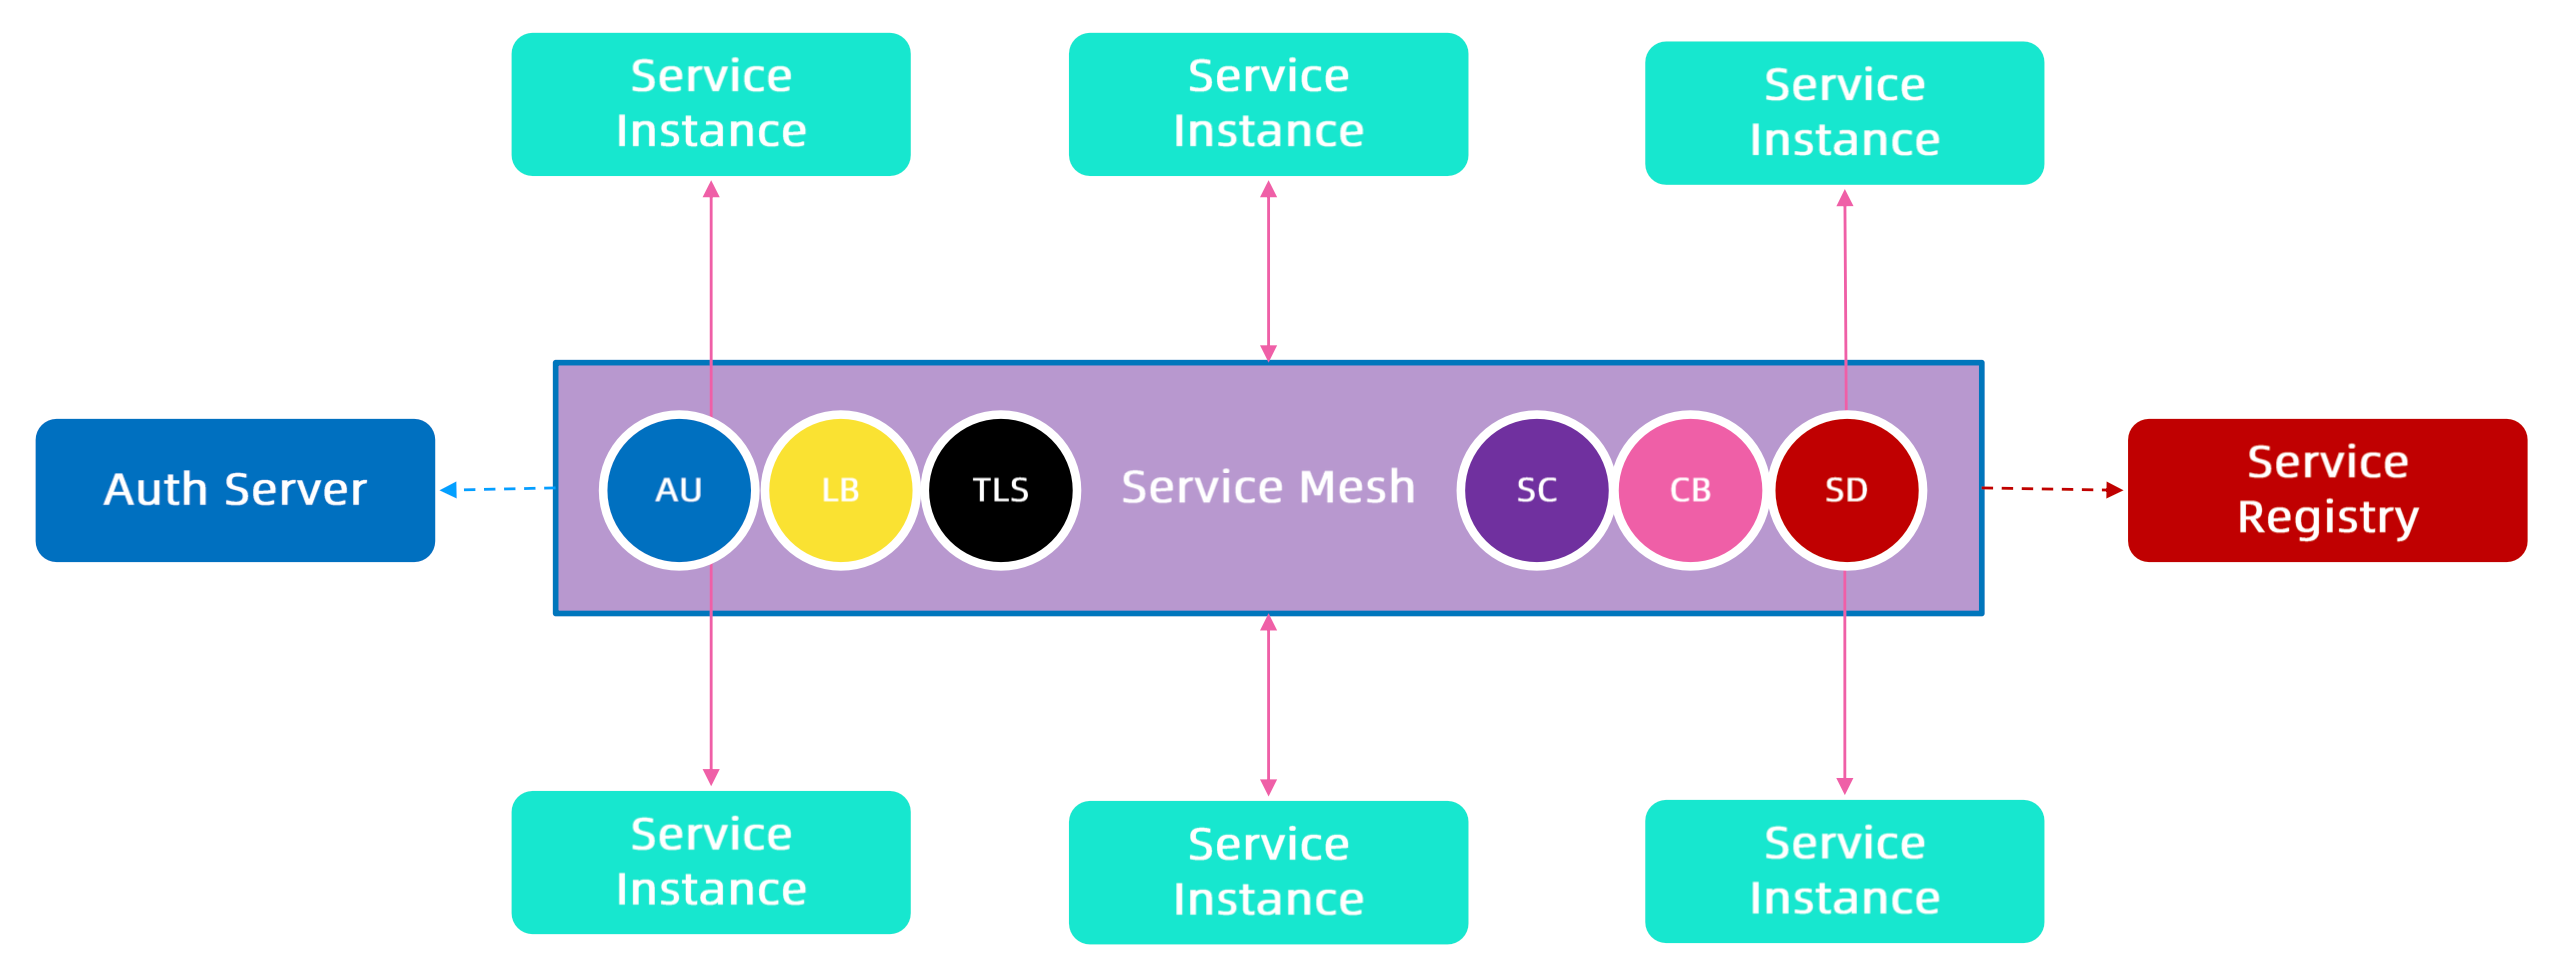
Service Mesh
将应用之间调用链路中的一些能力。服务发现、负载均衡、认证鉴权、协议升级、熔断等等独立的能力组合成网状结构,就是服务网格(Service Mesh)。可以理解为微服务平台 + Sidecar。
服务网格的能力
适应性
熔断
重试
超时处理
失败处理
负载均衡
Failover
服务发现
安全和访问控制
可观察性
Metrics监控
分布式日志
分布式 tracing
部署
通讯
微服务的优劣 优势:
将基础架构逻辑从业务代码中剥离出来
自由选择技术栈
帮助业务开发部门只关注业务逻辑
劣势:
复杂
可能带来额外的网络跳转
解决了一部分问题,同时要付出代价
依然要处理复杂路由,类型映射,与外部系统整合等方面问题
不解决业务逻辑或服务整合,服务组合等问题
服务网格可选方案
特点 Istio Linkerd
易于安装
由于各种配置选项和灵活性,对于团队来说可能不堪重负。
因为有内置和开箱即用的配置,适配起来是相对容易的
平台
Kubernetes、虚拟机
Kubernetes
支持的协议
gRPC、HTTP/2、HTTP/1.x、Websocket 和所有 TCP 流量。
gRPC、HTTP/2、HTTP/1.x、Websocket 和所有 TCP 流量。
入口控制器
Envoy,Istio 网关本身。
任何 – Linkerd 本身不提供入口功能。
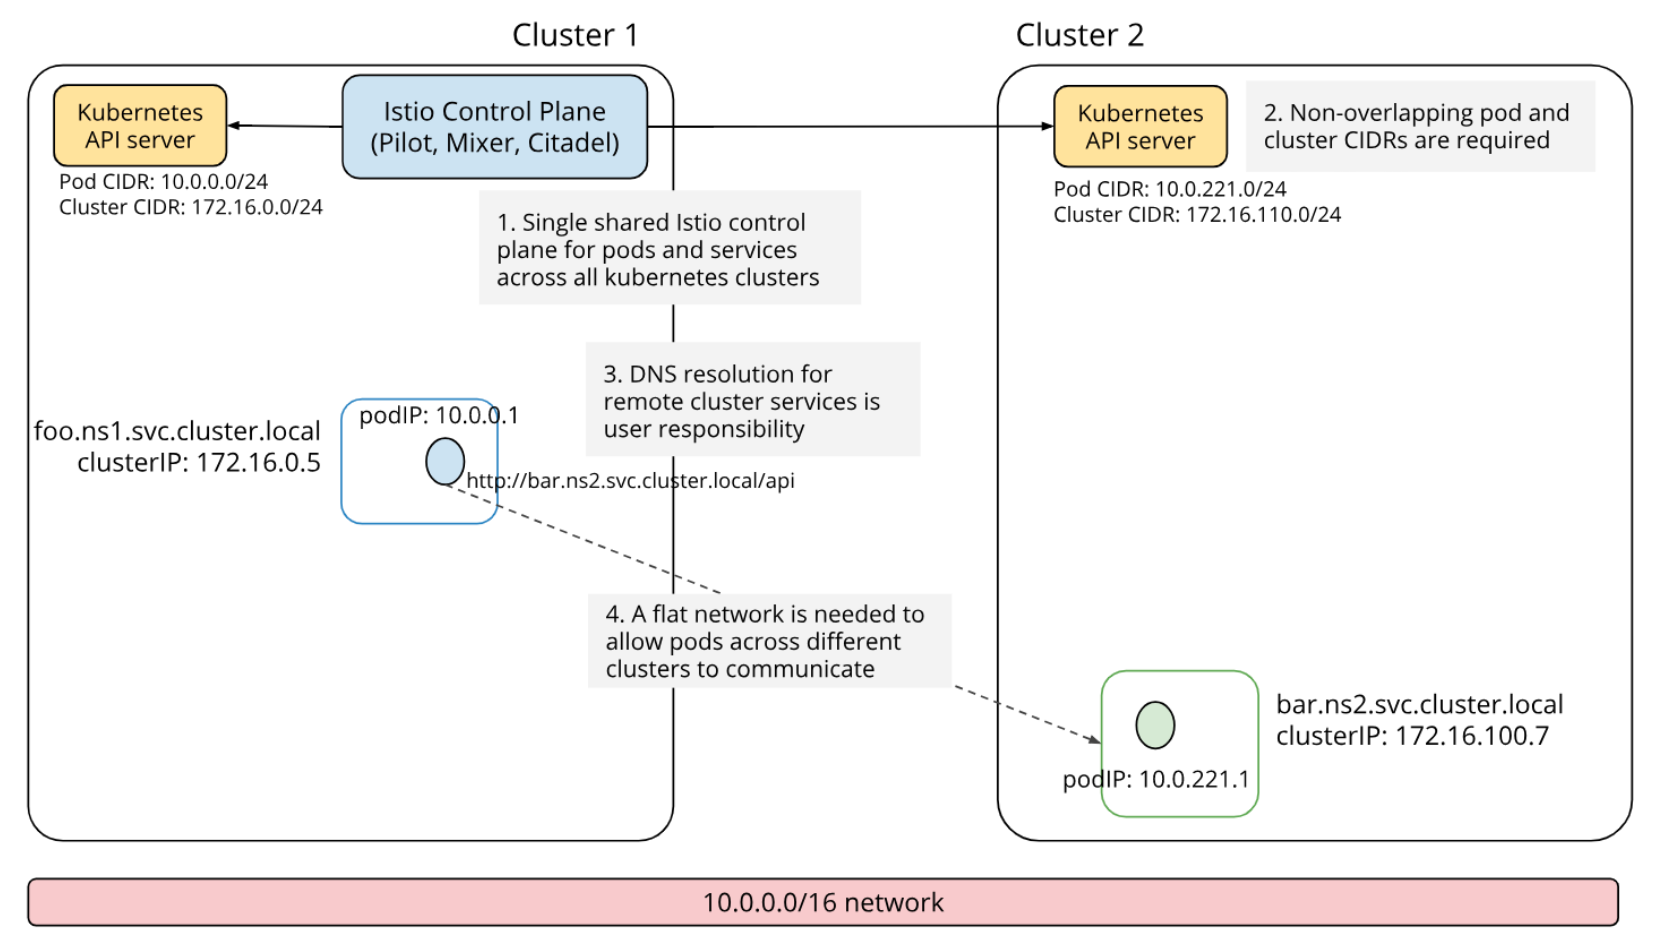
多集群网格和扩展支持
通过各种配置选项以及在 Kubernetes 集群外部扩展网格的稳定版本支持多集群部署。
2.7 版本,多群集部署仍处于试验阶段。根据最新版本 2.8,多群集部署是稳定的。
服务网格接口(SMI)兼容性
通过第三方 CRD。
原生的流量拆分和指标,而不用于流量访问控制。
监控功能
功能丰富
功能丰富
追踪支持
Jaeger、Zipkin
所有支持 OpenCensus 的后端
路由功能
各种负载均衡算法(轮训、随机最少连接),支持基于百分比的流量拆分,支持基于标头和路径的流量拆分。
支持 EWMA(指数加权移动平均)负载均衡算法,通过 SNI 支持基于百分比的流量拆分。
弹性
断路、重试和超时、故障注入、延迟注入。
无断路、无延迟注入支持。
安全
mTLS 支持所有协议、可以使用外部 CA 证书/密钥、支持授权规则。
除了 TCP 之外,还支持 mTLS,可以使用外部 CA/密钥,但尚不支持授权规则。
性能
在最新的 1.6 版本中,Istio 的资源占用越来越好并且延迟得到了改善。
Linkerd 的设计非常轻巧 - 根据第三方基准测试 ,它比 Istio 快 3-5 倍。
企业支援
不适用于 OSS 版本。如果您将 Google 的 GKE 与 Istio 一起使用,或者将 Red Hat OpenShift 与 Istio 作为服务网格使用,则可能会得到各个供应商的支持。
开发了 Linkerd OSS 版本的 Buoyant 提供了完整的企业级工程、支持和培训。
https://servicemesh.es/
什么是服务网格 服务网格(Service Mesh)这个术语通常用于描述构成这些应用程序的微服务网络以及应用之间的交互。随着规模和复杂性的增长,服务网格越来越难以理解和管理。
服务和服务之间,通过 Sidecar 和 Sidecar 之间点到点交互,形成一个大型网状结构。
它的需求包括服务发现、负载均衡、故障恢复、指标收集和监控以及通常更加复杂的运维需求,例如 A/B 测试、金丝雀发布、限流、访问控制和端到端认证等。
为什么要使用 Istio
HTTP、gRPC、WebSocket 和 TCP 流量的自动负载均衡通过丰富的路由规则、重试、故障转移和故障注入,可以对流量行为进行细粒度控制
可插入的策略层和配置 API,支持访问控制、速率限制和配额
对出入集群入口和出口中所有流量的自动度量指标、日志记录和跟踪
通过强大的基于身份的验证和授权,在集群中实现安全的服务间通信
Istio 功能概览
请求路由
服务发现和负载均衡
故障处理
故障注入
规则配置
流量管理 连接:
控制:
安全:
使开发人员可以专注于应用程序级别的安全性。Istio 提供底层安全通信信道,并大规模管理服务通信的认证、授权和加密。使用 Istio,服务通信在默认情况下时安全的,它允许跨多种协议和运行时一致地实施策略 - 所有这些都很少或者根本不需要应用程序更改。
虽然 Istio 与平台无关,但将其与 Kubernetes(或基础架构)网络策略结合使用,其优势会更大,包括在网络和应用层保护 Pod 间或服务间通信的能力。通过 NetworkPolicy 控制四层请求,Istio 可以直接作为 Ingress 的 Controller 控制七层网络请求。
可观察性:
Istio 生成以下类型的遥测数据,以提供对整个服务网格的可观察性:
指标:Istio 基于 4 个监控的黄金指标(延迟、流量、错误、饱和)生成了一系列服务指标。Istio 还为网格控制平面提供了更详细的指标。除此以外还提供了一组默认的基于这些指标的网格监控仪表板。
分布式追踪:Istio 为每个服务生成分布式追踪 span,运维人员可以理解网格内服务的依赖和调用流程。
访问日志:当流量流入网格中的服务时,Istio 可以生成每个请求的完整记录,包括源和目标的元数据。此信息使运维人员能够将服务行为的审查控制到单个工作负载实例的级别。
所有这些功能可以更有效地设置、监控和实施服务上的 SLO,快速有效地检测和修复问题。
Istio 架构演进 数据平面
由一组以 Sidecar 方式部署的智能代理(Envoy)组成。这些代理可以调节和控制微服务及 Mixer 之间所有的网络通信
控制平面
负责管理和配置代理来路由流量。此外控制平面配置 Mixer 以实施策略和收集遥测数据
架构演进
左边是早期架构,右边是现在的架构。
设计目标 最大化透明度
Istio 将自身自动注入到服务间所有的网络路径中,运维和开发人员只需付出很少的代价就可以从中受益
Istio 使用 Sidecar 代理来捕获流量,并且在尽可能的地方自动编程网络层,以路由流量通过这些代理,而无需对已部署的应用程序代码进行任何改动
在 Kubernetes 中,代理被注入到 Pod 中,通过编写 iptables 规则来捕获流量。注入 Sidecar 代理到 Pod 中并且修改路由规则后,Istio 就能够调解所有流量
所有组件和 API 在设计时都必须考虑性能和规模
增量
预计最大的需求时扩展策略系统,集成其他策略和控制来源,并将网格行为信号传播到其他系统进行分析。策略运行时支持标准扩展机制以便插入到其他服务中。
可移植性
将基于 Istio 的服务移植到新环境应该时轻而易举的,而使用 Istio 将一个服务同时部署到多个环境中也是可行的(例如,在多个云上进行冗余部署)。
策略一致性
在服务间的 API 调用中,策略的应用使得可以对网格间行为进行全面的控制,但对于无需在 API 级别表达的资源来说,对资源应用策略也同样重要
因此,策略系统作为独特的服务来维护,具有自己的 API,而不是将其放到代理 /sidecar 中,这允许服务根据需要直接与其集成。
深入理解数据平面 Envoy 主流七层代理的比较
Envoy
Nginx
HA Proxy
HTTP/2
对 HTTP/2 最有完整的支持,同时支持 upstream 和 downstream HTTP/2
从 1.9.5 开始有限支持 HTTP/2 只在 upstream server 支持 HTTP/2,downstream 依然是 1.1
不支持 HTTP/2
Rate Limit
通过插件支持限流
支持基于配置的限流,只支持基于源 IP 的限流
ACL
基于插件实现四层 ACL
基于源/目标地址实现 ACL
Connection draining
支持 hot reload,并且通过 share memory 实现 connection draining 的功能
Nginx Plus 收费版支持 connection draining
支持热启动,但不保证丢弃连接
Envoy 的优势 性能:
在具备大量特性的同时,Envoy 提供极高的吞吐量和低尾部延迟差异,而 CPU 和 RAM 消耗却相对较少
可扩展性:
Envoy 在 L4 和 L7 都提供了丰富的可插拔过滤器能力,使用户可以轻松添加开源版本中没有的功能
API 可配置性:
Envoy 提供了一组可以通过控制平面服务实现的管理 API。如果控制平面实现所有的 API,则可以使用通用引导配置在整个基础架构上运行 Envoy。所有进一步的配置更改通过管理服务器以无缝方式动态传送,因此 Envoy 从不需要重新启动。这使得 Envoy 成为通用数据平面,当它与一个足够复杂的控制平面相结合时,会极大的降低整体运维的复杂性。
Envoy 线程模式
Envoy 采用单进程多线程模式:
当某连接被监听器接受,那么该连接的全部生命周期会与某线程绑定
Envoy 基于非阻塞模式(Epoll)
建议 Envoy 配置的 worker 数量与 Envoy 所在的硬件线程数一致
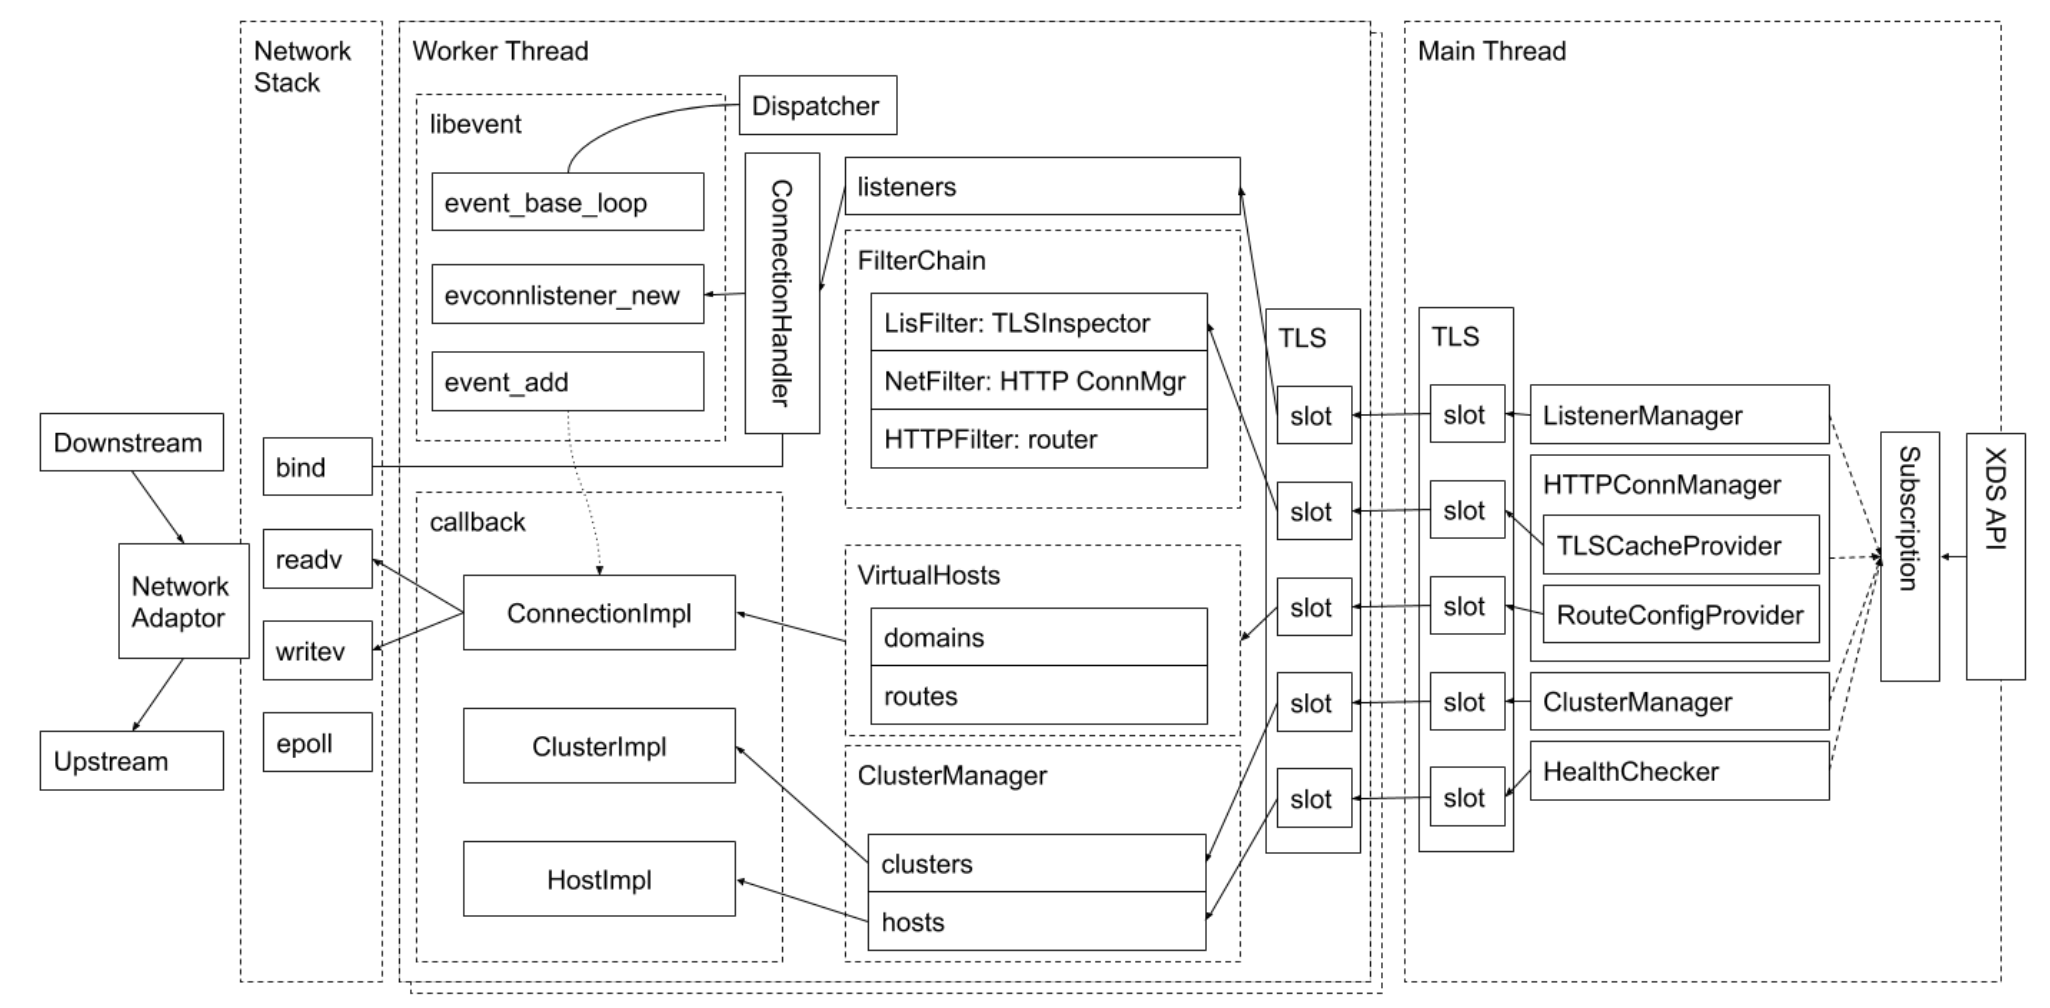
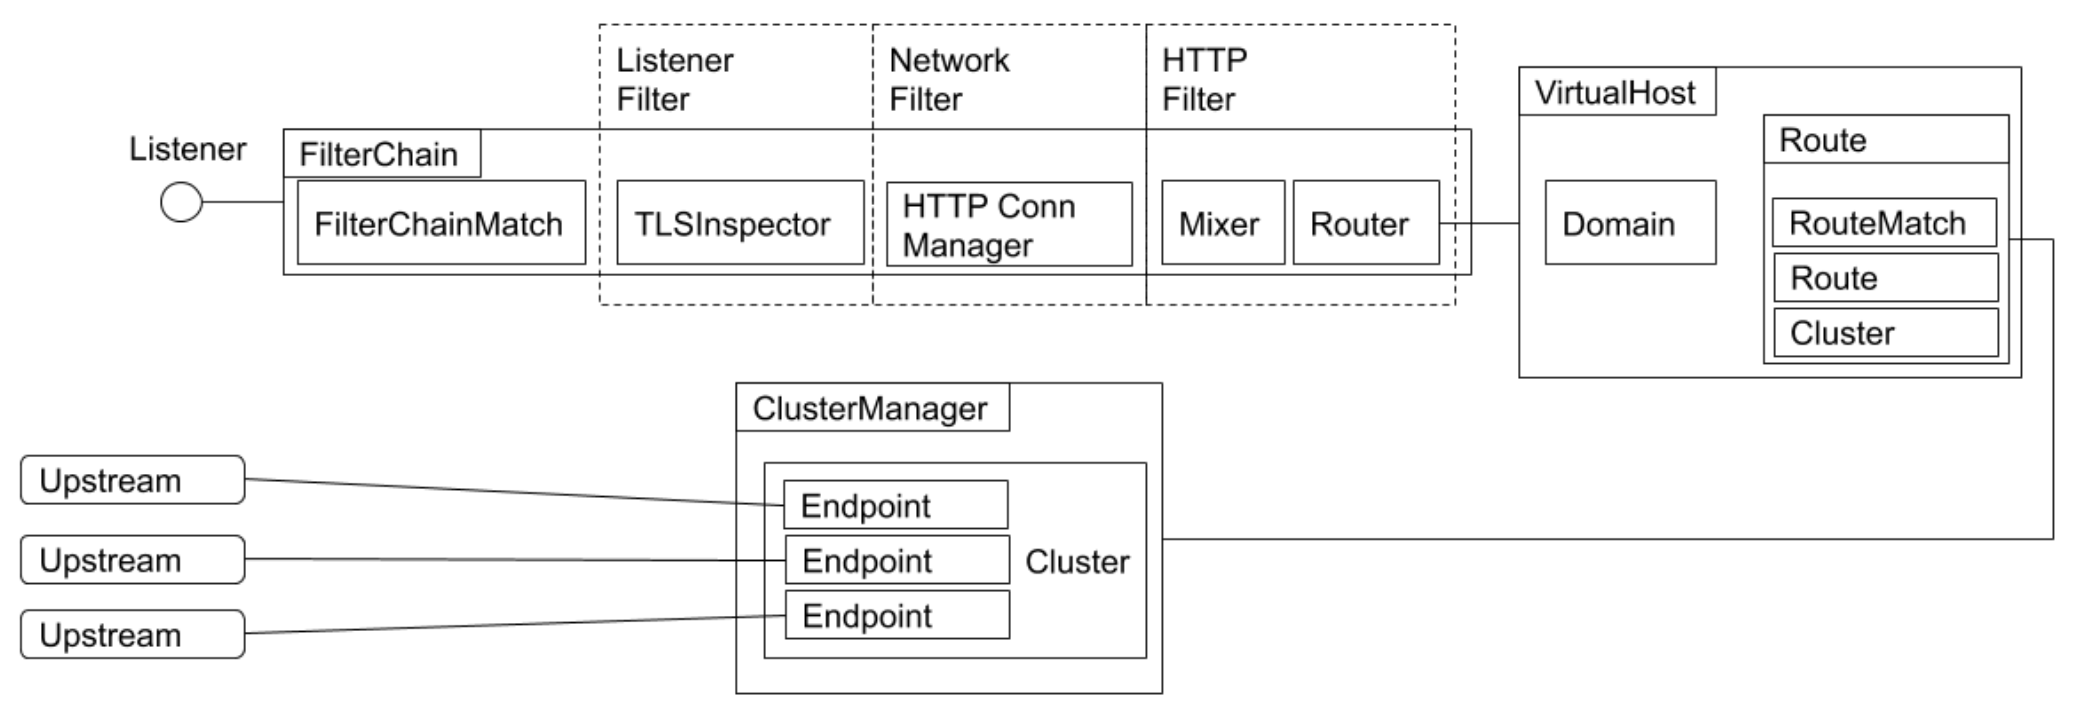
Envoy 架构
Listener:配置端口,负责监听RouteConfig:管理路由信息ClusterManager:节点管理,主机信息,对应后端部分的 hosts,也就是 endpoint 集合Worker Thread:读取配置信息,进行监听,等待获取连接并且处理请求
通过 Main Thread 下发的配置,决定请求如何过滤、转发
Main Thread 和 Worker Thread 之间通过 TLS 加密下发配置
V1 API 的缺点和 v2 的引入 V1 API 仅使用 JSON/REST,本质上是轮询。这有几个缺点:
尽管 Envoy 在内部使用的是 JSON 模式,但 API 本身并不是强类型,而且安全实现它们的通用服务器也很难
虽然轮询工作在实践中时很正常的用法,但更强大的控制平面更喜欢 streaming API,当其就绪后,可以将更新推送给每个 Envoy。这可以将更新传播时间从 30-60 秒降低到 250-500 毫秒,即使在极其庞大的部署中也是如此。
V2 API 具有以下属性:
新的 API 模式使用 proto3 指定,并同时以 gRPC 和 REST + JSON/YAML 端点实现。
它们被定义在一个名为 envoy-api 的新的专用源代码仓库中。proto3 的使用意味着这些 API 时强类型的,同时仍然通过 proto3 的 JSON/YAML 表示来支持 JSON/YAML 变体。
专用存储仓库的使用意味着项目可以更容易的使用 API 并用 gRPC 支持的所有语言生成存根(实际上,对于希望使用它的用户,我们将继续支持基于 REST 的 JSON/YAML 变体)。
xDS-Envoy 的发现机制 Endpoint Discovery Services(EDS):
这是 V1 SDS API 的替代品,此外 gRPC 的双向流性质将允许将负载/健康信息报告回管理服务器,为将来的全局负载均衡开启大门
Cluster Discovery Service(CDS):
Route Discovery Service(RDS):
Listener Discovery Service(LDS):
和 v1 的唯一主要变化是:现在允许监听器定义多个并发过滤栈,这些过滤栈可以基于一组监听器路由规则(例如,SNI,源/目的地 IP 匹配等)来选择。这是处理 原始目的地 策略路由的更简洁的方式,这种路由时透明数据平面解决方案(如 Istio)所需要的。
Secret Discovery Service(SDS):
一个专用的 API 来传递 TLS 密钥材料。这将解耦通过 LDS/CDS 发送主要监听器、集群配置和通过专用密钥管理系统发送密钥素材。
Health Discovery Service(HDS):
该 API 将允许 Envoy 成为分布式健康检查网络的成员。中央健康检查服务可以使用一组 Envoy 作为健康检查终点并将状态包报告回来,从而缓解 N2 健康检查问题,这个问题指的是其间的每个 Envoy 都可能需要对每个其他 Envoy 进行建行检查。
Aggregate Discovery Service(ADS):
总的各来说,Envoy 的设计时最终一致的。这意味着默认情况下,每个管理 API 都并发运行且不会相互交互。在某些情况下,一次一个管理服务器处理单个 Envoy 的所有更新时有益的(例如,如果需要对更新进行排序以避免流量下降)。此 API 允许通过单个管理服务器的单个 gRPC 双向流对所有其他 API 进行编组,从而实现确定性排序。
Envoy 的过滤器模式
Envoy 在四层和七层都可以通过不同的插件管理数据流向。
配置示例 envoy-deploy.yaml
1
2
3
4
5
6
7
8
9
10
11
12
13
14
15
16
17
18
19
20
21
22
23
24
25
26
27
apiVersion: apps/v1 kind: Deployment metadata: labels: run: envoy name: envoy spec: replicas: 1 selector: matchLabels: run: envoy template: metadata: labels: run: envoy spec: containers: - image: envoyproxy/envoy-dev name: envoy volumeMounts: - name: envoy-config mountPath: "/etc/envoy" readOnly: true volumes: - name: envoy-config configMap: name: envoy-config
envoy.yaml,将这个静态配置生成 configmap
kubectl create configmap envoy-config --from-file=envoy.yaml
1
2
3
4
5
6
7
8
9
10
11
12
13
14
15
16
17
18
19
20
21
22
23
24
25
26
27
28
29
30
31
32
33
34
35
36
37
38
39
40
41
42
admin: address: socket_address: { address: 127.0 .0 .1 , port_value: 9901 } static_resources: listeners: - name: listener_0 address: socket_address: { address: 0.0 .0 .0 , port_value: 10000 } filter_chains: - filters: - name: envoy.filters.network.http_connection_manager typed_config: "@type" : type.googleapis.com/envoy.extensions.filters.network.http_connection_manager.v3.HttpConnectionManager stat_prefix: ingress_http codec_type: AUTO route_config: name: local_route virtual_hosts: - name: local_service domains: ["*" ] routes: - match: { prefix: "/" } route: { cluster: some_service } http_filters: - name: envoy.filters.http.router typed_config: "@type" : type.googleapis.com/envoy.extensions.filters.http.router.v3.Router clusters: - name: some_service connect_timeout: 0. 25s type: LOGICAL_DNS lb_policy: ROUND_ROBIN load_assignment: cluster_name: some_service endpoints: - lb_endpoints: - endpoint: address: socket_address: address: simple port_value: 80
simple.yaml
1
2
3
4
5
6
7
8
9
10
11
12
13
14
15
16
17
18
19
20
21
22
23
24
25
26
27
28
29
30
31
32
33
34
35
36
apiVersion: apps/v1 kind: Deployment metadata: name: simple spec: replicas: 1 selector: matchLabels: app: simple template: metadata: annotations: prometheus.io/scrape: "true" prometheus.io/port: "80" labels: app: simple spec: containers: - name: simple imagePullPolicy: IfNotPresent image: nginx:alpine ports: - containerPort: 80 --- apiVersion: v1 kind: Service metadata: name: simple spec: ports: - name: http port: 80 protocol: TCP targetPort: 80 selector: app: simple
1
2
3
kubectl create -f simple.yaml kubectl create configmap envoy-config --from-file=envoy.yaml kubectl create -f envoy-deploy.yaml
验证
1 2 3 4 5 6 7 8 9 10 11 12 13 14 15 16 NAME READY STATUS RESTARTS AGE IP NODE NOMINATED NODE READINESS GATES envoy-7bb76496df-6tp26 1/1 Running 0 25m 10.244.34.84 slave01 <none> <none> simple-6d65c59685-6cq9z 1/1 Running 0 2m39s 10.244.57.214 slave02 <none> <none> <!DOCTYPE html> <html> <head > <title>Welcome to nginx!</title> <!DOCTYPE html> <html> <head > <title>Welcome to nginx!</title>
Istio 流量管理 官网自带中文,非常友好:
https://istio.io/latest/zh/docs/setup/getting-started/
安装 Istio 1 2 3 4 5 6 7 curl -L https://istio.io/downloadIstio | sh - cd istio-1.20.3/cp bin/istioctl /usr/local/bin/istioctl install --set profile=demo -y
一些 crd
1 2 3 4 5 6 7 8 9 10 11 12 13 14 15 16 authorizationpolicies.security.istio.io 2024-03-04T09:21:50Z destinationrules.networking.istio.io 2024-03-04T09:21:50Z envoyfilters.networking.istio.io 2024-03-04T09:21:51Z gateways.networking.istio.io 2024-03-04T09:21:51Z istiooperators.install.istio.io 2024-03-04T09:21:51Z peerauthentications.security.istio.io 2024-03-04T09:21:51Z proxyconfigs.networking.istio.io 2024-03-04T09:21:51Z requestauthentications.security.istio.io 2024-03-04T09:21:51Z serviceentries.networking.istio.io 2024-03-04T09:21:51Z sidecars.networking.istio.io 2024-03-04T09:21:51Z telemetries.telemetry.istio.io 2024-03-04T09:21:51Z virtualservices.networking.istio.io 2024-03-04T09:21:51Z wasmplugins.extensions.istio.io 2024-03-04T09:21:51Z workloadentries.networking.istio.io 2024-03-04T09:21:51Z workloadgroups.networking.istio.io 2024-03-04T09:21:51Z
流量管理
GatewayVirtualServiceDestinationRuleServiceEntryWorkloadEntrySidecar
通过 mutating 变形创建 pod 的请求
1 2 3 4 5 6 7 8 9 10 11 12 13 14 15 16 17 18 19 20 21 22 23 24 25 26 27 service: name: istiod namespace: istio-system path: /inject port: 443 failurePolicy: Fail matchPolicy: Equivalent name: object.sidecar-injector.istio.io namespaceSelector: matchLabels: istio.io/deactivated: never-match objectSelector: matchLabels: istio.io/deactivated: never-match reinvocationPolicy: Never rules: - apiGroups: - "" apiVersions: - v1 operations: - CREATE resources: - pods scope: '*' sideEffects: None
Istio 的流量劫持机制 为用户应用注入 Sidecar
自动注入
1 2 kubectl label namespace default istio-injection=enabled
手动注入
1 istioctl kube-inject -f yaml/istio-bookinfo/bookinfo.yaml
自动注入示例 1 2 3 kubectl create ns sidecar kubectl label ns sidecar istio-injection=enabled
1 2 3 4 5 6 7 8 9 10 11 12 13 14 15 16 17 18 19 20 21 22 23 24 25 26 27 28 29 30 apiVersion: apps/v1 kind: Deployment metadata: name: nginx-deployment spec: replicas: 1 selector: matchLabels: app: nginx template: metadata: labels: app: nginx spec: containers: - name: nginx image: nginx --- apiVersion: v1 kind: Service metadata: name: nginx spec: ports: - name: http port: 80 protocol: TCP targetPort: 80 selector: app: nginx
1 2 3 4 5 6 7 8 9 10 11 12 13 14 15 16 17 18 19 20 21 22 apiVersion: apps/v1 kind: Deployment metadata: name: toolbox spec: replicas: 1 selector: matchLabels: app: toolbox template: metadata: labels: app: toolbox access: "true" spec: containers: - name: toolbox image: centos command: - tail - -f - /dev/null
1 2 3 4 kubectl apply -f nginx.yaml -n sidecar kubectl apply -f toolbox.yaml -n sidecar
在客户端中通过 svc 访问服务端
1 2 3 4 5 6 7 8 9 10 11 12 13 14 15 16 17 18 19 20 21 22 23 24 25 [root@toolbox-5c4c69b9d7-kldls /] <!DOCTYPE html> <html> <head > <title>Welcome to nginx!</title> <style> html { color-scheme: light dark; } body { width: 35em; margin: 0 auto; font-family: Tahoma, Verdana, Arial, sans-serif; } </style> </head> <body> <h1>Welcome to nginx!</h1> <p>If you see this page, the nginx web server is successfully installed and working. Further configuration is required.</p> <p>For online documentation and support please refer to <a href="http://nginx.org/" >nginx.org</a>.<br/> Commercial support is available at <a href="http://nginx.com/" >nginx.com</a>.</p> <p><em>Thank you for using nginx.</em></p> </body> </html>
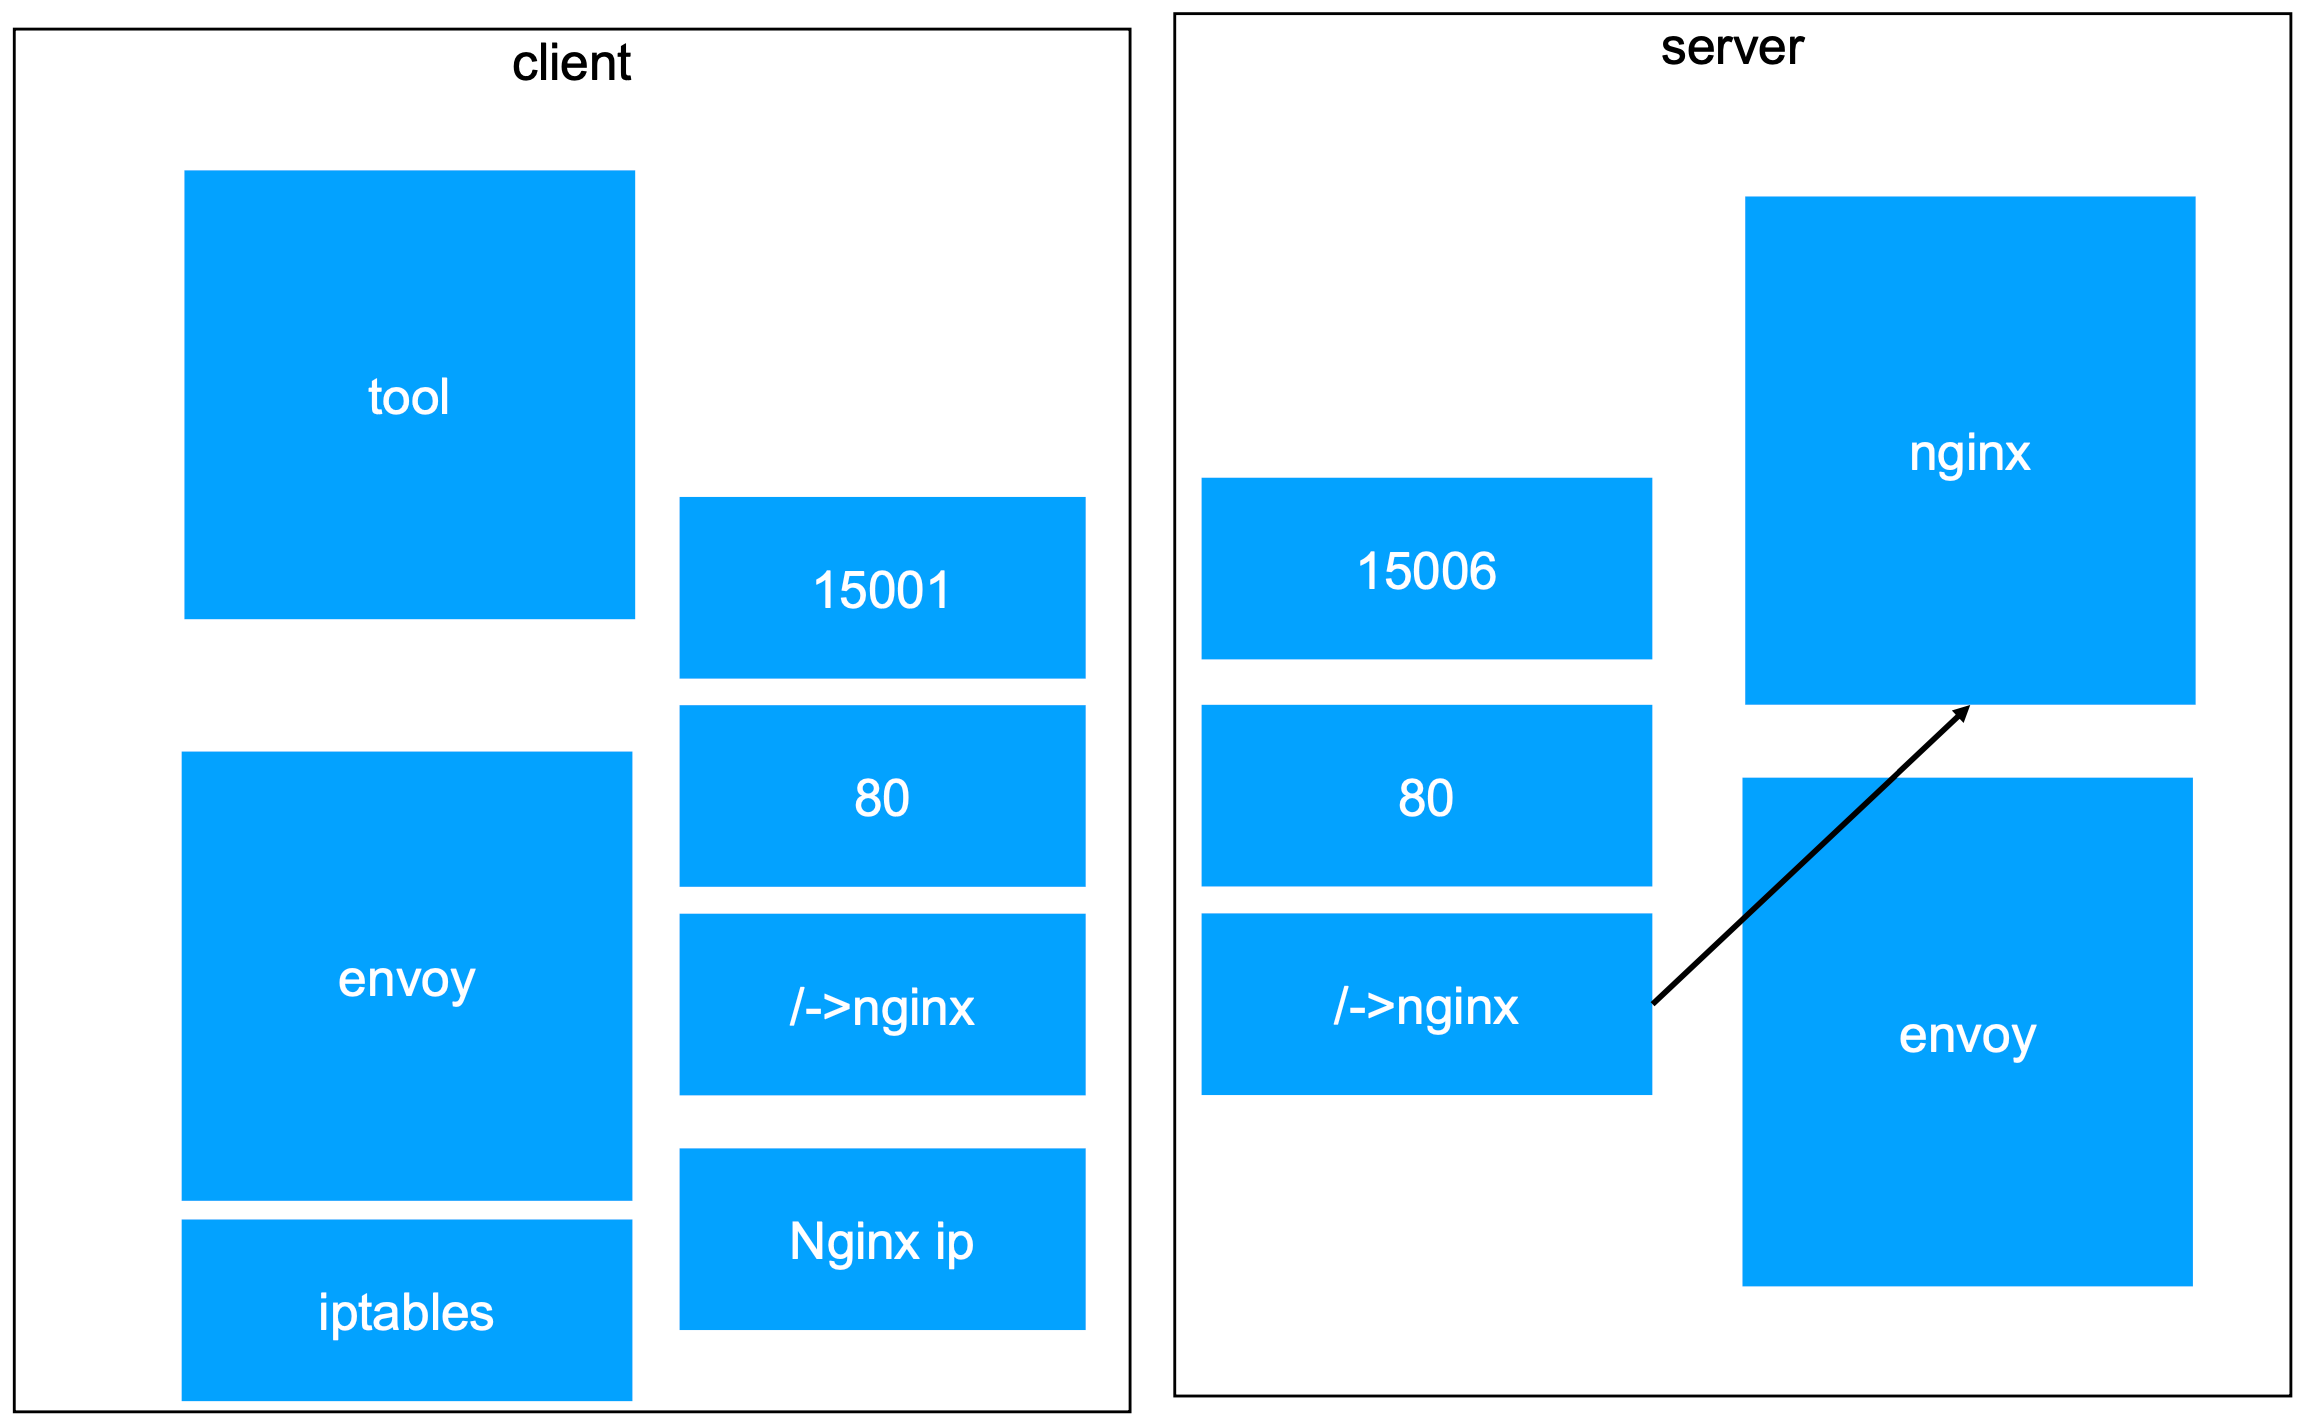
查看客户端 pod 的网络命名空间中的 iptables 配置,以及客户端网络流量流转
1 2 3 4 5 6 7 8 9 10 11 12 13 14 15 16 17 18 19 20 21 22 23 24 25 26 27 28 29 30 31 32 33 34 35 36 37 38 39 40 41 42 43 44 45 46 47 CONTAINER IMAGE CREATED STATE NAME ATTEMPT POD ID POD 206c2ec3ea310 aebe70f0b6fcf 41 minutes ago Running istio-proxy 0 7e92f51baaa3f toolbox-5c4c69b9d7-kldls 474bb857bc313 5d0da3dc97646 41 minutes ago Running toolbox 0 7e92f51baaa3f toolbox-5c4c69b9d7-kldls "pid" : 86036, "pid" : 1 "type" : "pid" *nat :PREROUTING ACCEPT [177:10620] :INPUT ACCEPT [177:10620] :OUTPUT ACCEPT [141:12451] :POSTROUTING ACCEPT [142:12511] :ISTIO_INBOUND - [0:0] :ISTIO_IN_REDIRECT - [0:0] :ISTIO_OUTPUT - [0:0] :ISTIO_REDIRECT - [0:0] -A PREROUTING -p tcp -j ISTIO_INBOUND -A OUTPUT -p tcp -j ISTIO_OUTPUT -A ISTIO_INBOUND -p tcp -m tcp --dport 15008 -j RETURN -A ISTIO_INBOUND -p tcp -m tcp --dport 15090 -j RETURN -A ISTIO_INBOUND -p tcp -m tcp --dport 15021 -j RETURN -A ISTIO_INBOUND -p tcp -m tcp --dport 15020 -j RETURN -A ISTIO_INBOUND -p tcp -j ISTIO_IN_REDIRECT -A ISTIO_IN_REDIRECT -p tcp -j REDIRECT --to-ports 15006 -A ISTIO_OUTPUT -s 127.0.0.6/32 -o lo -j RETURN -A ISTIO_OUTPUT ! -d 127.0.0.1/32 -o lo -p tcp -m tcp ! --dport 15008 -m owner --uid-owner 1337 -j ISTIO_IN_REDIRECT -A ISTIO_OUTPUT -o lo -m owner ! --uid-owner 1337 -j RETURN -A ISTIO_OUTPUT -m owner --uid-owner 1337 -j RETURN -A ISTIO_OUTPUT ! -d 127.0.0.1/32 -o lo -p tcp -m tcp ! --dport 15008 -m owner --gid-owner 1337 -j ISTIO_IN_REDIRECT -A ISTIO_OUTPUT -o lo -m owner ! --gid-owner 1337 -j RETURN -A ISTIO_OUTPUT -m owner --gid-owner 1337 -j RETURN -A ISTIO_OUTPUT -d 127.0.0.1/32 -j RETURN -A ISTIO_OUTPUT -j ISTIO_REDIRECT -A ISTIO_REDIRECT -p tcp -j REDIRECT --to-ports 15001 COMMIT
也就是说,所有的流量,都会被劫持到 15001 端口
1 2 3 4 5 6 7 8 9 10 11 12 13 14 15 16 17 18 19 20 21 22 23 24 25 26 27 28 29 30 31 32 33 34 35 36 37 38 39 40 41 42 43 44 45 46 47 48 49 50 51 52 53 54 55 56 57 58 59 60 61 62 63 64 65 66 67 68 69 70 71 72 73 74 75 76 77 78 79 80 81 82 83 84 85 86 87 88 89 90 91 NAME CLUSTER CDS LDS EDS RDS ECDS ISTIOD VERSION toolbox-5c4c69b9d7-kldls.sidecar Kubernetes SYNCED SYNCED SYNCED SYNCED NOT SENT istiod-689bbfd9b4-86zk7 1.20.3 { "name" : "virtualOutbound" , "address" : { "socketAddress" : { "address" : "0.0.0.0" , "portValue" : 15001 } }, "name" : "outbound|80||nginx.sidecar.svc.cluster.local" , "type" : "EDS" , "edsClusterConfig" : { "edsConfig" : { "ads" : {}, "initialFetchTimeout" : "0s" , "resourceApiVersion" : "V3" }, "serviceName" : "outbound|80||nginx.sidecar.svc.cluster.local" } 80 nginx.sidecar.svc.cluster.local:80 nginx, nginx.sidecar + 1 more... /* "name" : "nginx.sidecar.svc.cluster.local:80" , "domains" : [ "nginx.sidecar.svc.cluster.local" , "nginx" , "nginx.sidecar.svc" , "nginx.sidecar" , "10.104.85.98" ], "routes" : [ { "name" : "default" , "match" : { "prefix" : "/" }, "route" : { "cluster" : "outbound|80||nginx.sidecar.svc.cluster.local" , "timeout" : "0s" , "retryPolicy" : { "retryOn" : "connect-failure,refused-stream,unavailable,cancelled,retriable-status-codes" , "numRetries" : 2, "retryHostPredicate" : [ { "name" : "envoy.retry_host_predicates.previous_hosts" , "typedConfig" : { "@type" : "type.googleapis.com/envoy.extensions.retry.host.previous_hosts.v3.PreviousHostsPredicate" } } ], "hostSelectionRetryMaxAttempts" : "5" , "retriableStatusCodes" : [ 503 ] }, "maxGrpcTimeout" : "0s" }, "decorator" : { "operation" : "nginx.sidecar.svc.cluster.local:80/*" } } ] SERVICE FQDN PORT SUBSET DIRECTION TYPE DESTINATION RULE nginx.sidecar.svc.cluster.local 80 - outbound EDS hostStatuses: - address: socketAddress: address: 10.244.166.142 portValue: 80 healthStatus: NAME READY STATUS RESTARTS AGE IP NODE NOMINATED NODE READINESS GATES nginx-deployment-7854ff8877-t2jl6 2/2 Running 0 71m 10.244.166.142 node1 <none> <none> toolbox-5c4c69b9d7-kldls 2/2 Running 0 71m 10.244.104.15 node2 <none> <none>
也就是说,客户端访问域名端口的流量,被 sidecar 劫持后,会通过 istio 监听到的集群的 svc 生成对应 envoy 信息,匹配到 envoy 中的 cluster 配置,转发到对应 endpoint。
流量到 sidecar 中,依然要经过 iptables 处理
1 2 3 4 5 6 7 8 9 10 11 12 13 14 15 16 17 18 19 20 21 22 23 24 25 26 27 28 29 30 31 32 33 34 35 36 37 38 39 40 206c2ec3ea310 aebe70f0b6fcf About an hour ago Running istio-proxy 0 7e92f51baaa3f toolbox-5c4c69b9d7-kldls "pid" : 86066, "pid" : 1 "type" : "pid" *nat :PREROUTING ACCEPT [312:18720] :INPUT ACCEPT [312:18720] :OUTPUT ACCEPT [231:20319] :POSTROUTING ACCEPT [232:20379] :ISTIO_INBOUND - [0:0] :ISTIO_IN_REDIRECT - [0:0] :ISTIO_OUTPUT - [0:0] :ISTIO_REDIRECT - [0:0] -A PREROUTING -p tcp -j ISTIO_INBOUND -A OUTPUT -p tcp -j ISTIO_OUTPUT -A ISTIO_INBOUND -p tcp -m tcp --dport 15008 -j RETURN -A ISTIO_INBOUND -p tcp -m tcp --dport 15090 -j RETURN -A ISTIO_INBOUND -p tcp -m tcp --dport 15021 -j RETURN -A ISTIO_INBOUND -p tcp -m tcp --dport 15020 -j RETURN -A ISTIO_INBOUND -p tcp -j ISTIO_IN_REDIRECT -A ISTIO_IN_REDIRECT -p tcp -j REDIRECT --to-ports 15006 -A ISTIO_OUTPUT -s 127.0.0.6/32 -o lo -j RETURN -A ISTIO_OUTPUT ! -d 127.0.0.1/32 -o lo -p tcp -m tcp ! --dport 15008 -m owner --uid-owner 1337 -j ISTIO_IN_REDIRECT -A ISTIO_OUTPUT -o lo -m owner ! --uid-owner 1337 -j RETURN -A ISTIO_OUTPUT -m owner --uid-owner 1337 -j RETURN -A ISTIO_OUTPUT ! -d 127.0.0.1/32 -o lo -p tcp -m tcp ! --dport 15008 -m owner --gid-owner 1337 -j ISTIO_IN_REDIRECT -A ISTIO_OUTPUT -o lo -m owner ! --gid-owner 1337 -j RETURN -A ISTIO_OUTPUT -m owner --gid-owner 1337 -j RETURN -A ISTIO_OUTPUT -d 127.0.0.1/32 -j RETURN -A ISTIO_OUTPUT -j ISTIO_REDIRECT -A ISTIO_REDIRECT -p tcp -j REDIRECT --to-ports 15001 COMMIT
同理,处理对端,服务端的 Pod
1 2 3 4 5 6 7 8 9 10 11 12 13 14 15 16 17 18 19 20 21 22 23 24 25 26 27 28 29 30 31 32 33 34 35 36 37 38 39 40 41 42 43 44 45 46 47 48 49 50 51 52 53 54 55 56 57 58 59 60 61 62 63 64 65 66 67 68 69 70 71 72 73 74 75 76 77 78 79 80 81 82 83 84 85 86 87 88 89 90 91 92 93 94 95 96 97 98 99 100 101 102 103 104 105 106 107 108 109 110 111 112 113 114 115 116 117 118 119 120 121 122 123 124 125 126 127 128 129 130 131 132 133 134 135 136 137 138 139 140 141 CONTAINER IMAGE CREATED STATE NAME ATTEMPT POD ID POD 7b03f2d6ba5ea aebe70f0b6fcf About an hour ago Running istio-proxy 0 bac474281fbd1 nginx-deployment-7854ff8877-t2jl6 3e18dc5e50cb6 e4720093a3c13 About an hour ago Running nginx 0 bac474281fbd1 nginx-deployment-7854ff8877-t2jl6 "pid" : 129245, "pid" : 1 "type" : "pid" *nat :PREROUTING ACCEPT [338:20280] :INPUT ACCEPT [339:20340] :OUTPUT ACCEPT [228:20494] :POSTROUTING ACCEPT [228:20494] :ISTIO_INBOUND - [0:0] :ISTIO_IN_REDIRECT - [0:0] :ISTIO_OUTPUT - [0:0] :ISTIO_REDIRECT - [0:0] -A PREROUTING -p tcp -j ISTIO_INBOUND -A OUTPUT -p tcp -j ISTIO_OUTPUT -A ISTIO_INBOUND -p tcp -m tcp --dport 15008 -j RETURN -A ISTIO_INBOUND -p tcp -m tcp --dport 15090 -j RETURN -A ISTIO_INBOUND -p tcp -m tcp --dport 15021 -j RETURN -A ISTIO_INBOUND -p tcp -m tcp --dport 15020 -j RETURN -A ISTIO_INBOUND -p tcp -j ISTIO_IN_REDIRECT -A ISTIO_IN_REDIRECT -p tcp -j REDIRECT --to-ports 15006 -A ISTIO_OUTPUT -s 127.0.0.6/32 -o lo -j RETURN -A ISTIO_OUTPUT ! -d 127.0.0.1/32 -o lo -p tcp -m tcp ! --dport 15008 -m owner --uid-owner 1337 -j ISTIO_IN_REDIRECT -A ISTIO_OUTPUT -o lo -m owner ! --uid-owner 1337 -j RETURN -A ISTIO_OUTPUT -m owner --uid-owner 1337 -j RETURN -A ISTIO_OUTPUT ! -d 127.0.0.1/32 -o lo -p tcp -m tcp ! --dport 15008 -m owner --gid-owner 1337 -j ISTIO_IN_REDIRECT -A ISTIO_OUTPUT -o lo -m owner ! --gid-owner 1337 -j RETURN -A ISTIO_OUTPUT -m owner --gid-owner 1337 -j RETURN -A ISTIO_OUTPUT -d 127.0.0.1/32 -j RETURN -A ISTIO_OUTPUT -j ISTIO_REDIRECT -A ISTIO_REDIRECT -p tcp -j REDIRECT --to-ports 15001 COMMIT { "filterChainMatch" : { "destinationPort" : 80, "transportProtocol" : "raw_buffer" }, "filters" : [ { "name" : "envoy.filters.network.http_connection_manager" , "typedConfig" : { "@type" : "type.googleapis.com/envoy.extensions.filters.network.http_connection_manager.v3.HttpConnectionManager" , "statPrefix" : "inbound_0.0.0.0_80" , "routeConfig" : { "name" : "inbound|80||" , "virtualHosts" : [ { "name" : "inbound|http|80" , "domains" : [ "*" ], "routes" : [ { "name" : "default" , "match" : { "prefix" : "/" }, "route" : { "cluster" : "inbound|80||" , "timeout" : "0s" , "maxStreamDuration" : { "maxStreamDuration" : "0s" , "grpcTimeoutHeaderMax" : "0s" } }, "decorator" : { "operation" : "nginx.sidecar.svc.cluster.local:80/*" } } ] } ], "validateClusters" : false } { "name" : "nginx.sidecar.svc.cluster.local:80" , "domains" : [ "nginx.sidecar.svc.cluster.local" , "nginx" , "nginx.sidecar.svc" , "nginx.sidecar" , "10.104.85.98" ], "routes" : [ { "name" : "default" , "match" : { "prefix" : "/" }, "route" : { "cluster" : "outbound|80||nginx.sidecar.svc.cluster.local" , "timeout" : "0s" , "retryPolicy" : { "retryOn" : "connect-failure,refused-stream,unavailable,cancelled,retriable-status-codes" , "numRetries" : 2, "retryHostPredicate" : [ { "name" : "envoy.retry_host_predicates.previous_hosts" , "typedConfig" : { "@type" : "type.googleapis.com/envoy.extensions.retry.host.previous_hosts.v3.PreviousHostsPredicate" } } ], "hostSelectionRetryMaxAttempts" : "5" , "retriableStatusCodes" : [ 503 ] }, "maxGrpcTimeout" : "0s" }, "decorator" : { "operation" : "nginx.sidecar.svc.cluster.local:80/*" } } ], "includeRequestAttemptCount" : true },
在 Kubernetes 内部,Pod 和 Pod 之间的数据流转,基本可以参考下图, sidecar 挟持流量后,通过 iptables 做转发。
官网自动注入示例 1 2 kubectl apply -f samples/bookinfo/platform/kube/bookinfo.yaml
注入后的结果
注入了 init-container:istio-init
1 2 3 4 5 6 7 8 9 10 11 12 13 14 15 16 17 18 19 20 21 22 23 initContainers: - args: - istio-iptables - -p - "15001" - -z - "15006" - -u - "1337" - -m - REDIRECT - -i - '*' - -x - "" - -b - '*' - -d - 15090 ,15021,15020 - --log_output_level=default:info image: docker.io/istio/proxyv2:1.20.3 imagePullPolicy: IfNotPresent name: istio-init
1 istio-iptables -p 15001 -z 15006 -u 1337 -m REDIRECT -i * -x -b * -d 15090,15021,15020 --log_output_level=default:info
注入了 sidecar container: istio-proxy
1 2 3 4 5 6 7 8 9 10 11 12 13 14 15 16 17 18 19 20 21 22 23 24 25 26 27 28 29 30 31 32 33 34 35 36 37 38 39 40 41 42 43 44 45 46 47 48 49 50 51 52 53 54 55 56 57 58 59 60 61 62 63 64 65 66 67 68 69 70 71 72 73 74 75 76 77 78 79 80 81 82 83 84 85 86 87 88 89 90 91 92 93 94 95 96 97 98 99 100 101 102 103 104 105 106 107 108 109 110 111 112 113 114 115 116 117 118 119 120 121 122 123 124 - args: - proxy - sidecar - --domain - $(POD_NAMESPACE).svc.cluster.local - --proxyLogLevel=warning - --proxyComponentLogLevel=misc:error - --log_output_level=default:info env: - name: JWT_POLICY value: third-party-jwt - name: PILOT_CERT_PROVIDER value: istiod - name: CA_ADDR value: istiod.istio-system.svc:15012 - name: POD_NAME valueFrom: fieldRef: apiVersion: v1 fieldPath: metadata.name - name: POD_NAMESPACE valueFrom: fieldRef: apiVersion: v1 fieldPath: metadata.namespace - name: INSTANCE_IP valueFrom: fieldRef: apiVersion: v1 fieldPath: status.podIP - name: SERVICE_ACCOUNT valueFrom: fieldRef: apiVersion: v1 fieldPath: spec.serviceAccountName - name: HOST_IP valueFrom: fieldRef: apiVersion: v1 fieldPath: status.hostIP - name: ISTIO_CPU_LIMIT valueFrom: resourceFieldRef: divisor: "0" resource: limits.cpu - name: PROXY_CONFIG value: | {} - name: ISTIO_META_POD_PORTS value: |- [ {"containerPort":9080,"protocol":"TCP"} ] - name: ISTIO_META_APP_CONTAINERS value: details - name: GOMEMLIMIT valueFrom: resourceFieldRef: divisor: "0" resource: limits.memory - name: GOMAXPROCS valueFrom: resourceFieldRef: divisor: "0" resource: limits.cpu - name: ISTIO_META_CLUSTER_ID value: Kubernetes - name: ISTIO_META_NODE_NAME valueFrom: fieldRef: apiVersion: v1 fieldPath: spec.nodeName - name: ISTIO_META_INTERCEPTION_MODE value: REDIRECT - name: ISTIO_META_WORKLOAD_NAME value: details-v1 - name: ISTIO_META_OWNER value: kubernetes://apis/apps/v1/namespaces/default/deployments/details-v1 - name: ISTIO_META_MESH_ID value: cluster.local - name: TRUST_DOMAIN value: cluster.local image: docker.io/istio/proxyv2:1.20.3 imagePullPolicy: IfNotPresent name: istio-proxy ports: - containerPort: 15090 name: http-envoy-prom protocol: TCP readinessProbe: failureThreshold: 4 httpGet: path: /healthz/ready port: 15021 scheme: HTTP periodSeconds: 15 successThreshold: 1 timeoutSeconds: 3 resources: limits: cpu: "2" memory: 1Gi requests: cpu: 10m memory: 40Mi securityContext: allowPrivilegeEscalation: false capabilities: drop: - ALL privileged: false readOnlyRootFilesystem: true runAsGroup: 1337 runAsNonRoot: true runAsUser: 1337 startupProbe: failureThreshold: 600 httpGet: path: /healthz/ready port: 15021 scheme: HTTP periodSeconds: 1 successThreshold: 1 timeoutSeconds: 3
验证在一个 pod 中使用 svc 访问另外一个 pod 中的服务:
1 2 <title>Simple Bookstore App</title>
1 2 3 4 5 6 7 8 9 10 11 12 kubectl apply -f samples/bookinfo/networking/bookinfo-gateway.yaml export INGRESS_HOST=$(kubectl get po -l istio=ingressgateway -n istio-system -o jsonpath='{.items[0].status.hostIP}' )export INGRESS_PORT=$(kubectl -n istio-system get service istio-ingressgateway -o jsonpath='{.spec.ports[?(@.name=="http2")].nodePort}' )export GATEWAY_URL=$INGRESS_HOST :$INGRESS_PORT echo "$GATEWAY_URL " 192.168.239.130:31634 echo "http://$GATEWAY_URL /productpage"
流量流动图:
数据转发路径 Init container 通过 crictl inspecti aebe70f0b6fcf 命令查看 init container 镜像的详细信息:
使用 istio-proxy 用户身份运行,UID 为 1337,即 Envoy 所处的用户空间,这也是 istio-proxy 容器默认使用的用户,见 YAML 配置中的 runAsUser 字段。
1 2 3 4 5 { "created": "2024-01-31T19:04:46.41880868Z" , "created_by": "RUN /bin/sh -c useradd -m --uid 1337 istio-proxy \u0026\u0026 echo \"istio-proxy ALL=NOPASSWD: ALL\" \u003e\u003e /etc/sudoers # buildkit" , "comment": "buildkit.dockerfile.v0" },
1 2 3 4 5 privileged: false readOnlyRootFilesystem: true runAsGroup: 1337 runAsNonRoot: true runAsUser: 1337
initContainers 的作用是创建一些 ipbtlaes 规则,然后退出。默认情况下,Pod 中所有的 container 用的都是同一个 Network Namespace。
1 2 3 4 5 6 7 8 9 10 11 12 13 14 15 16 17 18 19 20 initContainers: - args: - istio-iptables - -p - "15001" - -z - "15006" - -u - "1337" - -m - REDIRECT - -i - '*' - -x - "" - -b - '*' - -d - 15090 ,15021,15020 - --log_output_level=default:info
将应用容器的所有流量都转发到 Envoy 的 15001 端口,由 sidecar 接收和管理,
使用默认的 REDIRECT 模式来重定向流量。
将所有出站流量都重定向到 Envoy 代理。
将所有访问 9080 端口(即应用容器 productpage 的端口)的流量重定向到 Envoy 代理。
进入到 envoy 容器中,查看 nat 表
1 2 3 4 5 6 7 8 ff26f0b0e582d aebe70f0b6fcf 5 hours ago Running istio-proxy 0 cc49857f6ef86 productpage-v1-675fc69cf-dnt78 "pid" : 19775, "pid" : 1 "type" : "pid"
1 2 3 4 5 6 7 8 9 10 11 12 13 14 15 16 17 18 19 20 21 22 23 24 25 26 27 28 29 30 31 32 33 34 // 所有入站 TCP 流量走 ISTIO_INBOUND -A PREROUTING -p tcp -j ISTIO_INBOUND // 所有出站 TCP 流量走 ISTIO_OUTPUT -A OUTPUT -p tcp -j ISTIO_OUTPUT // 忽略 ssh、health check 等端口 -A ISTIO_INBOUND -p tcp -m tcp --dport 15008 -j RETURN -A ISTIO_INBOUND -p tcp -m tcp --dport 15090 -j RETURN -A ISTIO_INBOUND -p tcp -m tcp --dport 15021 -j RETURN -A ISTIO_INBOUND -p tcp -m tcp --dport 15020 -j RETURN // 所有入站流量走 ISTIO_IN_REDIRECT -A ISTIO_INBOUND -p tcp -j ISTIO_IN_REDIRECT // 所有流量都转发到 15006 -A ISTIO_IN_REDIRECT -p tcp -j REDIRECT --to-ports 15006 // loopback口出,源是 127 来放行 -A ISTIO_OUTPUT -s 127.0.0.6/32 -o lo -j RETURN // lo 口出来不是本机,目标端口不是 15008,用户是 1337 交由 ISTIO_IN_REDIRECT 处理 -A ISTIO_OUTPUT ! -d 127.0.0.1/32 -o lo -p tcp -m tcp ! --dport 15008 -m owner --uid-owner 1337 -j ISTIO_IN_REDIRECT // lo 口出来,用户不是 1337 ,放行 -A ISTIO_OUTPUT -o lo -m owner ! --uid-owner 1337 -j RETURN // 用户是 1337 的流量出去,放行 -A ISTIO_OUTPUT -m owner --uid-owner 1337 -j RETURN -A ISTIO_OUTPUT ! -d 127.0.0.1/32 -o lo -p tcp -m tcp ! --dport 15008 -m owner --gid-owner 1337 -j ISTIO_IN_REDIRECT -A ISTIO_OUTPUT -o lo -m owner ! --gid-owner 1337 -j RETURN -A ISTIO_OUTPUT -m owner --gid-owner 1337 -j RETURN -A ISTIO_OUTPUT -d 127.0.0.1/32 -j RETURN // 以上都不匹配,流量转到ISTIO_REDIRECT -A ISTIO_OUTPUT -j ISTIO_REDIRECT // 流量都转发到 15001 -A ISTIO_REDIRECT -p tcp -j REDIRECT --to-ports 15001 COMMIT
Sidecar container Istio 会生成以下监听器:
0.0.0.0:15001 上的监听器接收进出 Pod 的所有流量,然后将请求移交给虚拟监听器每个 service IP 一个虚拟监听器,每个出站 TCP/HTTPS 流量一个非 HTTP 监听器。
每个 Pod 入站流量暴露的端口一个虚拟监听器。
每个出站 HTTP 流量的 HTTP 0.0.0.0 端口一个虚拟监听器。
1 2 3 4 5 6 7 8 9 10 11 12 13 14 15 16 17 18 19 20 21 22 23 24 25 26 27 28 29 30 31 [ { "name" : "virtualOutbound" , "address" : { "socketAddress" : { "address" : "0.0.0.0" , "portValue" : 15001 } }, "filterChains" : [ { "filterChainMatch" : { "destinationPort" : 15001 }, "filters" : [ { "name" : "istio.stats" , "typedConfig" : { "@type" : "type.googleapis.com/stats.PluginConfig" } }, { "name" : "envoy.filters.network.tcp_proxy" , "typedConfig" : { "@type" : "type.googleapis.com/envoy.extensions.filters.network.tcp_proxy.v3.TcpProxy" , "statPrefix" : "BlackHoleCluster" , "cluster" : "BlackHoleCluster" } } ],
请求是到 9080 端口的 HTTP 出站请求,这意味着它被切换到 0.0.0.0:9080 虚拟监听器。然后,此监听器在其配置的 RDS 中查找路由配置。在这种情况下,它将查找由 Pilot 配置的 RDS 中的路由 9080(通过 ADS)。
1 2 3 4 5 6 7 8 9 "rds" : { "configSource" : { "ads" : {}, "initialFetchTimeout" : "0s" , "resourceApiVersion" : "V3" }, "routeConfigName" : "9080" }
9080 路由配置仅为每个服务提供虚拟主机。
我们的请求正在前往 reviews 服务,因此 Envoy 将选择我们的请求与域匹配的虚拟主机。一旦在域上匹配,Envoy 会查找与请求匹配的第一条路径。在这种情况下,我们没有任何高级路由,因此只有一条路由匹配所有内容。
这条路由告诉 Envoy 将请求发送到 outbound|9080||reviews.default.svc.cluster.local 集群。
1 2 3 4 5 6 7 8 9 10 11 12 13 14 15 16 17 18 19 20 21 22 23 24 25 26 27 28 29 30 31 32 33 34 35 36 37 38 39 40 41 42 43 44 45 46 47 48 [ { "name": "9080" , "virtualHosts": [ { "name": "reviews.default.svc.cluster.local:9080" , "domains": [ "reviews.default.svc.cluster.local" , "reviews" , "reviews.default.svc" , "reviews.default" , "10.106.148.147" ], "routes": [ { "name": "default" , "match": { "prefix": "/" }, "route": { "cluster": "outbound|9080||reviews.default.svc.cluster.local" , "timeout": "0s" , "retryPolicy": { "retryOn": "connect-failure,refused-stream,unavailable,cancelled,retriable-status-codes" , "numRetries": 2 , "retryHostPredicate": [ { "name": "envoy.retry_host_predicates.previous_hosts" , "typedConfig": { "@type" : "type.googleapis.com/envoy.extensions.retry.host.previous_hosts.v3.PreviousHostsPredicate" } } ], "hostSelectionRetryMaxAttempts": "5" , "retriableStatusCodes": [ 503 ] }, "maxGrpcTimeout": "0s" }, "decorator": { "operation": "reviews.default.svc.cluster.local:9080/*" } } ], "includeRequestAttemptCount": true }
此集群配置为从 Pilot(通过 ADS)检索关联的端点。因此,Envoy 将使用 serviceName 字段作为密钥来查找端点列表并将请求代理到其中一个端点。
1 2 3 4 5 6 7 8 9 10 11 12 13 14 # istioctl pc cluster productpage-v1-675 fc69cf-dnt78 --fqdn='reviews.default.svc.cluster.local' -ojson "name" : "outbound|9080||reviews.default.svc.cluster.local" , "type" : "EDS" , "edsClusterConfig" : { "edsConfig" : { "ads" : { } , "initialFetchTimeout" : "0s" , "resourceApiVersion" : "V3" } , "serviceName" : "outbound|9080||reviews.default.svc.cluster.local" } , "connectTimeout" : "10s" , "lbPolicy" : "LEAST_REQUEST" , "circuitBreakers" : {
流量管理
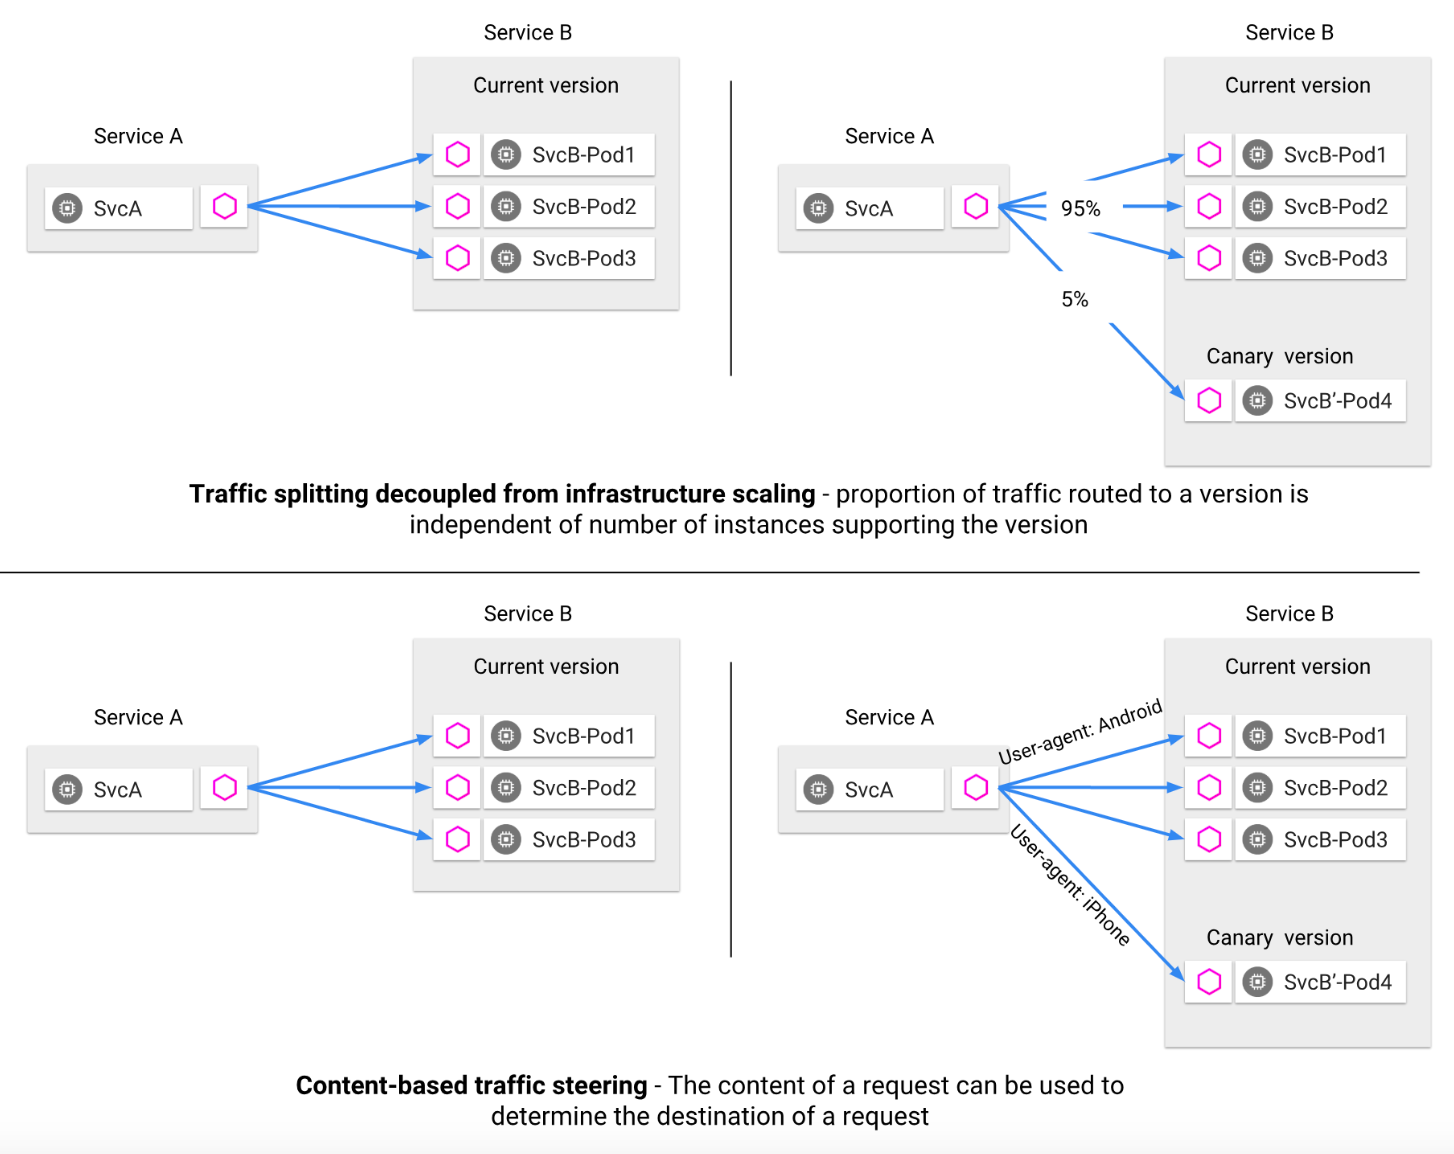
按照百分比将流量切分到不同的应用版本
通过 Header 区分不同的版本,带有一些特殊 Header 的流量转发到新版本
请求路由 特定网格中服务的规范表示由 Pilot 维护。服务的 Istio 模型和在底层平台(Kubernetes、Mesos 以及 Cloud Foundry 等)中的表达无关。特定平台的适配器负责从各自平台中获取元数据的各种字段,然后对服务模型进行填充。
Istio 引入了服务版本的概念,可以通过版本(v1、v2)或环境(staging、prod)对服务进行进一步的细分。这些版本不一定时不同的 API 版本:它们可能是部署在不同环境(prod、staging 或者 dev 等)中的同一服务的不同迭代。使用这种方式的常见场景包括 A/B 测试或金丝雀部署。
Istio 的流量路由规则可以根据服务版本来对服务之间流量进行附加控制。
服务之间的通讯 服务的客户端不着调服务不同版本间的差异。它们可以使用服务的主机名或者 IP 地址继续访问服务。Envoy sidecar/代理拦截并转发客户端和服务端之间的所有请求和响应。
Istio 还为同一服务版本的多个实例提供流量负载均衡。就可以在服务发现和负载均衡中找到更多信息。
Istio 不提供 DNS。应用程序可以尝试使用底层平台(kube-dns、mesos-dns 等)中存在的 DNS 服务来解析 FQDN。
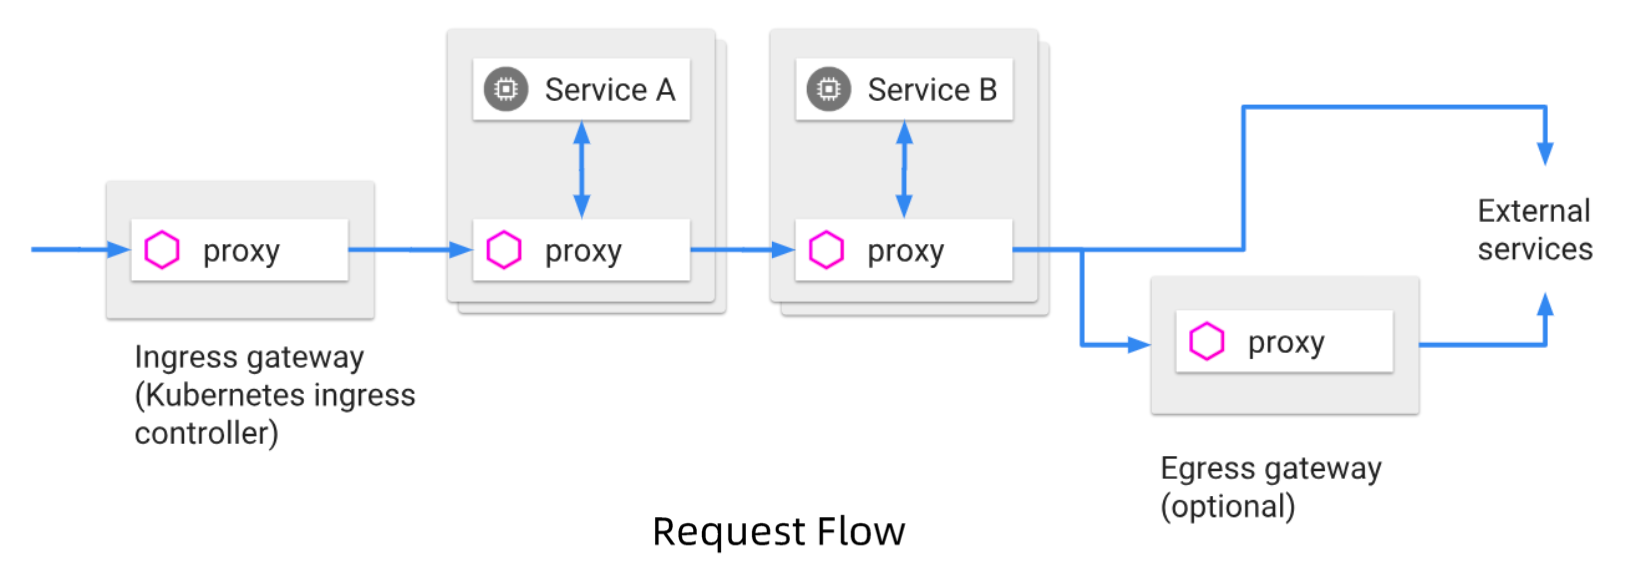
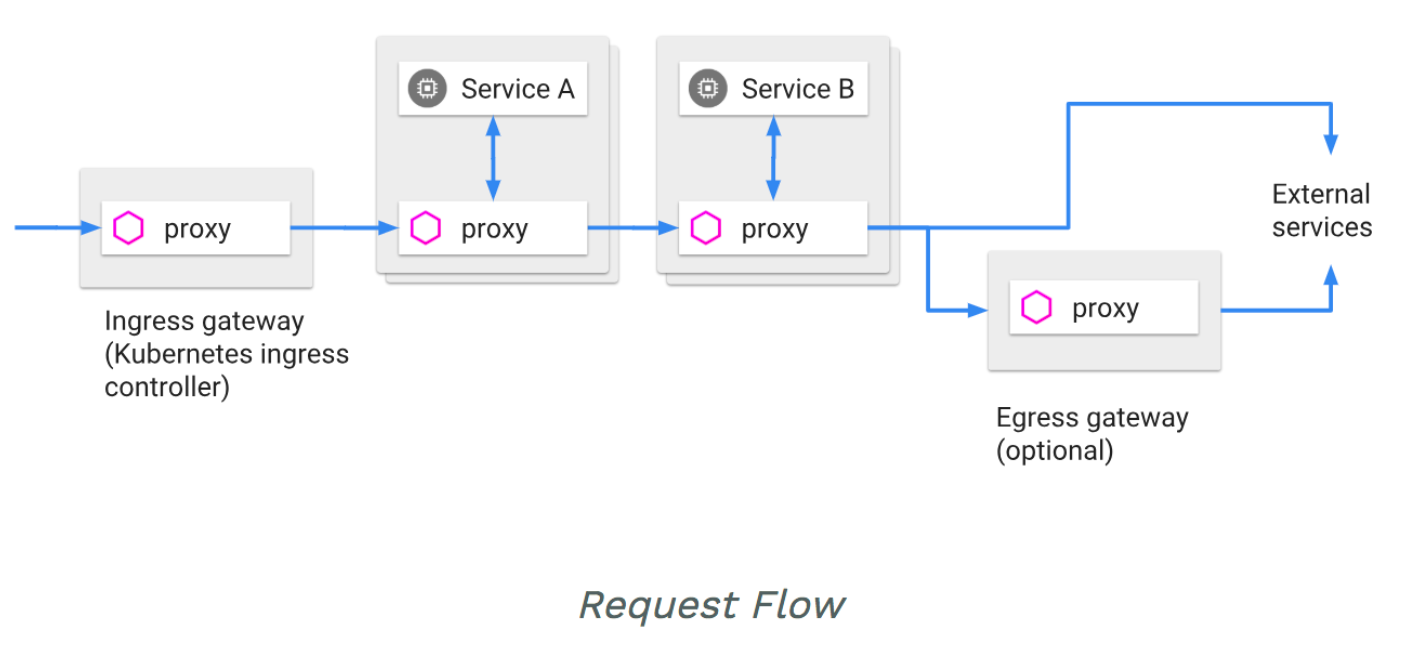
Ingress 和 Egress Istio 假定进入和离开服务网络的所有流量都会通过 Envoy 代理进行传输。
通过将 Envoy 代理部署在服务之前,运维人员可以针对面向用户服务进行 A/B 测试、部署金丝雀服务等。
类似地,通过使用 Envoy 将流量路由到外部 Web 服务(例如,访问 Maps API 或视频服务 API)的方式,运维人员可以为这些服务添加超时控制、重试、断路器等功能,同时还能从服务连接中获取各种细节指标。
服务发现、负载均衡、熔断、重试 Istio 负载均衡服务网格中实例之间的通信。
Istio 假定存在服务注册表,以跟踪应用程序中服务的 pod/VM。它还假设服务的新实例自动注册到服务注册表,并且不健康的实例将被自动删除。诸如 Kubernetes、Mesos 等平台已经为基于容器的应用程序提供了这样的功能。为基于虚拟机的应用程序提供的解决方案就更多了。
Pilot 使用来自服务注册的信息,并提供与平台无关的服务发现接口。网格中的 Envoy 实例执行服务发现,并相应地动态更新其负载均衡池。
网格中的服务使用其 DNS 名称访问彼此。服务的所有 HTTP 流量都会通过 Envoy 自动重新路由。Envoy 在负载均衡池中的实例之间分发流量。虽然 Envoy 支持多种复杂的负载均衡算法,但 Istio 目前仅允许三种负载均衡模式:轮询、随机和带权重的最少请求。
除了负载均衡外,Envoy 还会定期检查池中每个实例的运行状况。Envoy 遵循熔断器风格模式,根据健康检查 API 调用的失败率将实例分类为不健康和健康两种。当给定实例的健康检查失败次数超过预订阈值时,将会被从负载均衡池中弹出。类似地,当通过的健康检查数超过预订阈值时,该实例将被添加回负载均衡池。您可以在处理故障中了解更多有关 Envoy 的故障处理功能。
服务可以通过使用 HTTP 503 响应健康检查来主动减轻负担。在这种情况下,服务实例将立即从调用者的负载均衡池中删除。
还可以通过在 Envoy 中配置重试规则,出现一些特定的响应码则进行重试,设置重试次数、间隔。
故障处理 这些功能都可以 Istio 对象动态配置
超时处理
基于超时预算的重试机制
基于并发连接和请求的流量控制
对负载均衡器成员的健康检查
细粒度的熔断机制,可以针对 Load Balancing Pool 中的每个成员设置规则
微调 Istio 的流量管理规则允许运维人员为每个服务/版本设置故障恢复的全局默认值。然而,服务的消费者也可以通过特殊的 HTTP 头提供的请求级别值覆盖超时和重试的默认值。在 Envoy 代理的实现中,对应的 Header 分别是 x-envoy-upstream-rq-time-ms 和 x-envoy-max-retries。
故障注入 为什么需要错误注入:
Istio 允许在网络层面按协议注入错误来模拟错误,无需通过应用层面删除 Pod,或者人为在 TCP 层造成网络故障来模拟。
注入的错误可以基于特定的条件,可以设置出现错误的比例:
Delay - 提高网络延迟Aborts - 直接返回特定的错误码
规则配置 VirtualService 在 Istio 服务网格中定义路由规则,控制路由如何路由到服务上。
DestinationRule 是 VirtualService 路由生效后,配置应用与请求的策略集。
ServiceEntry 时通常用于在 Istio 服务网格之外启用对服务的请求。
Gateway 为 HTTP/TCP 流量配置负载均衡器,最常见的是在网格的边缘的操作,以启用应用程序的入口流量。
VirtualService 是在 Istio 服务网格内对服务的请求如何进行路由控制。
simple.yaml
1 2 3 4 5 6 7 8 9 10 11 12 13 14 15 16 17 18 19 20 21 22 23 24 25 26 27 28 29 30 31 32 33 34 35 apiVersion: apps/v1 kind: Deployment metadata: name: simple spec: replicas: 1 selector: matchLabels: app: simple template: metadata: annotations: prometheus.io/scrape: "true" prometheus.io/port: "80" labels: app: simple spec: containers: - name: simple image: nginx ports: - containerPort: 80 --- apiVersion: v1 kind: Service metadata: name: simple spec: ports: - name: http port: 80 protocol: TCP targetPort: 80 selector: app: simple
istio-specs.yaml
1 2 3 4 5 6 7 8 9 10 11 12 13 14 15 16 17 18 19 20 21 22 23 24 25 26 27 28 29 30 31 32 33 34 35 36 37 apiVersion: networking.istio.io/v1beta1 kind: VirtualService metadata: name: simple spec: gateways: - simple hosts: - simple.xxx.io http: - match: - port: 80 route: - destination: host: simple.simple.svc.cluster.local port: number: 80 --- apiVersion: networking.istio.io/v1beta1 kind: Gateway metadata: name: simple spec: selector: istio: ingressgateway servers: - hosts: - simple.xxx.io port: name: http-simple number: 80 protocol: HTTP
1 2 3 4 5 kubectl create ns simple kubectl create -f simple.yaml -n simple kubectl create -f istio-specs.yaml -n simple
通过 istio 的 ingress 访问服务
1 2 3 4 5 6 7 8 9 10 11 12 13 14 15 16 17 18 19 20 21 22 23 24 25 26 istio-ingressgateway LoadBalancer 10.106.173.205 <pending> 15021:30211/TCP,80:30826/TCP,443:32310/TCP,31400:30744/TCP,15443:32580/TCP 26h * Trying 10.106.173.205:80... * TCP_NODELAY set * Connected to 10.106.173.205 (10.106.173.205) port 80 ( > GET / HTTP/1.1 > Host: simple.xxx.io > User-Agent: curl/7.68.0 > Accept: */* > * Mark bundle as not supporting multiuse < HTTP/1.1 200 OK < server: istio-envoy < date : Thu, 07 Mar 2024 05:56:19 GMT < content-type: text/html < content-length: 615 < last-modified: Wed, 14 Feb 2024 16:03:00 GMT < etag: "65cce434-267" < accept-ranges: bytes < x-envoy-upstream-service-time: 4 < <!DOCTYPE html> <html> <head > <title>Welcome to nginx!</title>
通过前缀匹配,并且改写
增加一个 svc:
nginx.yaml
1 2 3 4 5 6 7 8 9 10 11 12 13 14 15 16 17 18 19 20 21 22 23 24 25 26 27 28 29 30 apiVersion: apps/v1 kind: Deployment metadata: name: nginx-deployment spec: replicas: 1 selector: matchLabels: app: nginx template: metadata: labels: app: nginx spec: containers: - name: nginx image: nginx --- apiVersion: v1 kind: Service metadata: name: nginx spec: ports: - name: http port: 80 protocol: TCP targetPort: 80 selector: app: nginx
istio-specs.yaml
1 2 3 4 5 6 7 8 9 10 11 12 13 14 15 16 17 18 19 20 21 22 23 24 25 26 27 28 29 30 31 32 33 34 35 36 37 38 39 40 41 42 43 44 45 46 47 apiVersion: networking.istio.io/v1beta1 kind: VirtualService metadata: name: nginx spec: gateways: - simple hosts: - simple.xxx.io http: - match: - uri: exact: "/simple" rewrite: uri: "/" route: - destination: host: simple.simple.svc.cluster.local port: number: 80 - match: - uri: prefix: "/nginx" rewrite: uri: "/" route: - destination: host: nginx.simple.svc.cluster.local port: number: 80 --- apiVersion: networking.istio.io/v1beta1 kind: Gateway metadata: name: nginx spec: selector: istio: ingressgateway servers: - hosts: - simple.xxx.io port: name: http-simple number: 80 protocol: HTTP
1 2 curl -H "Host: simple.xxx.io" 10.106.173.205/simple -v curl -H "Host: simple.xxx.io" 10.106.173.205/nginx -v
TLS 模式 1 2 3 4 5 6 kubectl create ns securesvc kubectl label ns securesvc istio-injection=enabled kubectl create -f httpserver.yaml -n securesvc
1 2 3 4 5 6 7 8 9 10 11 12 13 14 15 16 17 18 19 20 21 22 23 24 25 26 27 28 29 30 31 32 33 34 35 apiVersion: apps/v1 kind: Deployment metadata: name: httpserver spec: replicas: 1 selector: matchLabels: app: httpserver template: metadata: annotations: prometheus.io/scrape: "true" prometheus.io/port: "80" labels: app: httpserver spec: containers: - name: httpserver image: nginx ports: - containerPort: 80 --- apiVersion: v1 kind: Service metadata: name: httpserver spec: ports: - name: http port: 80 protocol: TCP targetPort: 80 selector: app: httpserver
1 2 3 4 5 6 openssl req -x509 -sha256 -nodes -days 365 -newkey rsa:2048 -subj '/O=xxx Inc./CN=*.xxx.io' -keyout xxx.io.key -out xxx.io.crt kubectl create -n istio-system secret tls xxx-credential --key=xxx.io.key --cert=xxx.io.crt kubectl apply -f istio-specs.yaml -n securesvc
1 2 3 4 5 6 7 8 9 10 11 12 13 14 15 16 17 18 19 20 21 22 23 24 25 26 27 28 29 30 31 32 33 34 35 apiVersion: networking.istio.io/v1beta1 kind: VirtualService metadata: name: httpsserver spec: gateways: - httpsserver hosts: - httpsserver.xxx.io http: - match: - port: 443 route: - destination: host: httpserver.securesvc.svc.cluster.local port: number: 80 --- apiVersion: networking.istio.io/v1beta1 kind: Gateway metadata: name: httpsserver spec: selector: istio: ingressgateway servers: - hosts: - httpsserver.xxx.io port: name: https-default number: 443 protocol: HTTPS tls: mode: SIMPLE credentialName: xxx-credential
获取 ingress 的 IP
1 2 istio-ingressgateway LoadBalancer 10.106.173.205 <pending> 15021:30211/TCP,80:30826/TCP,443:32310/TCP,31400:30744/TCP,15443:32580/TCP 32h
使用指定解析的方式访问
1 curl --resolve httpsserver.xxx.io:443:10.106.173.205 https://httpsserver.xxx.io -v -k
可正常访问到
规则的目标描述 路由规则对应着一或多个用 VirtualService 配置指定的请求目的主机。这些主机可以是也可以不是实际的目标负载,甚至可以不是同一网格内可路由的服务。例如要给 reviews 服务的请求定义路由规则,可以使用内部的名称 reviews,也可以用域名 bookinfo.com,VirtualService 可以定义这样的 host 字段:
host 字段用显式或者隐式的方式定义了一或多个完全限定名(FQDN)。上面的 reviews,会隐式的扩展成为特定的 FQDN,例如在 Kubernetes 环境中,全名会从 VirtualService 所在的集群和命名空间中继承而来(比如说 reviews.default.svc.cluster.local)。
1 2 3 hosts: - simple.xxx.io - reviews
在服务之间分拆流量 例如下面的规则会把 25% 的 canary 服务流量分配给 v2 标签;其余的 75%流量分配给v1`。
1 2 3 4 5 6 7 8 9 10 11 12 13 14 15 16 17 18 19 20 21 22 23 24 25 26 27 28 29 30 31 32 33 34 35 36 37 38 39 40 41 42 43 44 45 apiVersion: networking.istio.io/v1beta1 kind: VirtualService metadata: name: canary spec: hosts: - canary http: - match: - headers: user: exact: jesse route: - destination: host: canary subset: v2 weight: 25 - route: - destination: host: canary subset: v1 weight: 75 --- apiVersion: networking.istio.io/v1alpha3 kind: DestinationRule metadata: name: canary spec: host: canary trafficPolicy: loadBalancer: simple: RANDOM subsets: - name: v1 labels: version: v1 - name: v2 labels: version: v2 trafficPolicy: loadBalancer: simple: ROUND_ROBIN
超时和重试 1 2 3 4 5 6 7 8 9 10 11 12 13 14 apiVersion: networking.istio.io/v1alpha3 kind: VirtualService metadata: name: reviews spec: hosts: - reviews http: - route: - destination: host: reviews subset: v2 timeout: 0. 5s
1 2 3 4 5 6 7 8 9 10 11 12 13 14 15 16 17 apiVersion: networking.istio.io/v1alpha3 kind: VirtualService metadata: name: ratings-route spec: hosts: - ratings.prod.svc.cluster.local http: - route: - destination: host: ratings.prod.svc.cluster.local subset: v1 retries: attempts: 3 perTryTimeout: 2s retryOn: connect-failure,refused-stream,503
错误注入 超时的请求
1 2 3 4 5 6 7 8 9 10 11 12 13 14 15 16 17 18 19 20 21 22 23 apiVersion: networking.istio.io/v1beta1 kind: VirtualService spec: hosts: - ratings http: - fault: delay: fixedDelay: 7s percentage: value: 100 match: - headers: end-user: exact: jason route: - destination: host: ratings subset: v1 - route: - destination: host: ratings subset: v1
错误码
1 2 3 4 5 6 7 8 9 10 11 12 13 14 15 16 17 18 19 20 21 22 23 apiVersion: networking.istio.io/v1beta1 kind: VirtualService spec: hosts: - ratings http: - fault: abort: httpStatus: 500 percentage: value: 100 match: - headers: end-user: exact: jason route: - destination: host: ratings subset: v1 - route: - destination: host: ratings subset: v1
条件规则 基于 uri 前缀
1 2 3 4 5 6 7 8 9 10 11 12 13 14 15 16 17 18 19 20 21 22 apiVersion: networking.istio.io/v1alpha3 kind: VirtualService metadata: name: bookinfo spec: hosts: - "bookinfo.com" gateways: - mygateway http: - match: - uri: prefix: "/productpage" delegate: name: productpage namespace: nsA - match: - uri: prefix: "/reviews" delegate: name: reviews namespace: nsB
基于 header
1 2 3 4 5 6 7 8 9 10 11 12 13 14 15 16 17 18 19 20 21 22 23 24 25 apiVersion: networking.istio.io/v1alpha3 kind: VirtualService metadata: name: reviews-route spec: hosts: - reviews.prod.svc.cluster.local http: - headers: request: set: test: "true" route: - destination: host: reviews.prod.svc.cluster.local subset: v2 weight: 25 - destination: host: reviews.prod.svc.cluster.local subset: v1 headers: response: remove: - foo weight: 75
基于 sourceLabels
1 2 3 4 5 6 7 8 9 10 11 12 13 14 15 16 17 18 19 20 apiVersion: networking.istio.io/v1alpha3 kind: VirtualService metadata: name: reviews-route spec: hosts: - reviews.prod.svc.cluster.local http: - match: - sourceLabels: env: prod route: - destination: host: reviews.prod.svc.cluster.local subset: v1 fault: delay: percentage: value: 0.1 fixedDelay: 5s
流量镜像 mirror 规则可以使 Envoy 截取所有 request,并在转发请求的同时,将 request 转发至 Mirror 版本,同时在 Header 的 Host/Authority 加上 -shadow。
这些 mirror 请求会在工作在 fire and forget 模式,所有的 response 都会被废弃。
1 2 3 4 5 6 7 8 9 10 11 12 13 14 15 16 17 18 apiVersion: networking.istio.io/v1alpha3 kind: VirtualService metadata: name: httpbin spec: hosts: - httpbin http: - route: - destination: host: httpbin subset: v1 weight: 100 mirror: host: httpbin subset: v2 mirrorPercentage: value: 100.0
规则委托 描述了委托 VirtualService。以下路由规则通过名为 productpage 的委托 VirtualService 将流量转发到 productpage,通过名为 reviews 的委托 VirtualService 将流量转发到 reviews。
1 2 3 4 5 6 7 8 9 10 11 12 13 14 15 16 17 18 19 20 21 22 apiVersion: networking.istio.io/v1alpha3 kind: VirtualService metadata: name: bookinfo spec: hosts: - "bookinfo.com" gateways: - mygateway http: - match: - uri: prefix: "/productpage" delegate: name: productpage namespace: nsA - match: - uri: prefix: "/reviews" delegate: name: reviews namespace: nsB
1 2 3 4 5 6 7 8 9 10 11 12 13 14 15 16 apiVersion: networking.istio.io/v1alpha3 kind: VirtualService metadata: name: productpage namespace: nsA spec: http: - match: - uri: prefix: "/productpage/v1/" route: - destination: host: productpage-v1.nsA.svc.cluster.local - route: - destination: host: productpage.nsA.svc.cluster.local
1 2 3 4 5 6 7 8 9 10 apiVersion: networking.istio.io/v1alpha3 kind: VirtualService metadata: name: reviews namespace: nsB spec: http: - route: - destination: host: reviews.nsB.svc.cluster.local
优先级 当对同一目标有多个规则时,会按照在 VirtualService 中的顺序进行应用,换句话说,列表中的第一条规则具有最高优先级。
当对某个服务的路由时完全基于权重的时候,就可以在单一规则中完成。另一方面,如果有多重条件(例如来自特定用户的请求)用来进行路由,就会需要不止一条规则。这样就出现了优先级问题,需要通过优先级来保证根据正确的顺序来执行规则。
常见的路由模式是提供一或多个高优先级规则,这些优先规则使用源服务以及 Header 来进行路由判断,然后才提供一条单独的基于权重的规则,这些低优先级规则不设置匹配规则,仅根据权重对所有剩余流量进行分流。
目标规则 在请求被 VirtualService 路由之后,DestinationRule 配置的一系列策略就生效了。这些策略由服务属主编写,包含断路器、负载均衡以及 TLS 等的配置内容。
1 2 3 4 5 6 7 8 9 10 11 12 13 14 15 16 apiVersion: networking.istio.io/v1alpha3 kind: DestinationRule metadata: name: bookinfo-ratings-port spec: host: ratings.prod.svc.cluster.local trafficPolicy: portLevelSettings: - port: number: 80 loadBalancer: simple: LEAST_REQUEST - port: number: 9080 loadBalancer: simple: ROUND_ROBIN
断路器 可以用一系列的标准,例如连接数和请求数限制来定义简单的断路器。
可以通过定义 outlierDetection 自定义健康检查模式。
1 2 3 4 5 6 7 8 9 10 11 12 13 14 15 16 17 apiVersion: networking.istio.io/v1alpha3 kind: DestinationRule metadata: name: reviews-cb-policy spec: host: reviews.prod.svc.cluster.local trafficPolicy: connectionPool: tcp: maxConnections: 100 http: http2MaxRequests: 1000 maxRequestsPerConnection: 10 outlierDetection: consecutive5xxErrors: 7 interval: 5m baseEjectionTime: 15m
ServiceEntry Istio 内部会维护一个服务注册表,可以用 ServiceEntry 向其中加入额外的条目。通常这个对象用来启用对 Istio 服务网格之外的服务发出请求。
ServiceEntry 中使用 hosts 字段来指定目标,字段值可以时一个完全限定名,也可以是个通配符域名。其中包含的白名单,包含一对多个允许网格中服务访问的服务。
只要 ServiceEntry 涉及到了匹配 host 的服务,就可以和 VirtualService 以及 DestinationRule 配合工作。
1 2 3 4 5 6 7 8 9 10 11 12 13 14 15 apiVersion: networking.istio.io/v1alpha3 kind: ServiceEntry metadata: name: external-svc-https spec: hosts: - api.dropboxapi.com - www.googleapis.com - api.facebook.com location: MESH_EXTERNAL ports: - number: 443 name: https protocol: TLS resolution: DNS
WorkloadEntry 1 2 3 4 5 6 7 8 9 10 11 12 13 14 15 16 17 18 19 20 21 apiVersion: networking.istio.io/v1alpha3 kind: WorkloadEntry metadata: name: details-vm-1 spec: serviceAccount: details address: 2.2 .2 .2 labels: app: details instance-id: vm1 --- apiVersion: networking.istio.io/v1alpha3 kind: WorkloadEntry metadata: name: details-vm-2 spec: serviceAccount: details address: 3.3 .3 .3 labels: app: details instance-id: vm2
1 2 3 4 5 6 7 8 9 10 11 12 13 14 15 16 apiVersion: networking.istio.io/v1alpha3 kind: ServiceEntry metadata: name: details-svc spec: hosts: - details.bookinfo.com location: MESH_INTERNAL ports: - number: 80 name: http protocol: HTTP resolution: STATIC workloadSelector: labels: app: details
Gateway Gateway 为 HTTP/TCP 流量配置了一个负载均衡,多数情况下在网格边缘进行操作,用于启用一个服务的入口(ingress)流量。
和 Kubernetes Ingress 不同,Istio Gateway 只配置四层到六层的功能(例如开放端口或者 TLS 配置)。绑定一个 VirtualService 到 Gateway 上,用户就可以使用标准的 Istio 规则来控制进入的 HTTP 和 TCP 流量。
1 2 3 4 5 6 7 8 9 10 11 12 13 14 15 16 17 18 19 20 21 22 23 24 25 26 27 28 29 30 31 32 33 34 35 36 37 38 39 40 41 42 43 44 45 46 47 48 49 50 apiVersion: networking.istio.io/v1alpha3 kind: Gateway metadata: name: my-gateway namespace: some-config-namespace spec: selector: app: my-gateway-controller servers: - port: number: 80 name: http protocol: HTTP hosts: - uk.bookinfo.com - eu.bookinfo.com tls: httpsRedirect: true - port: number: 443 name: https-443 protocol: HTTPS hosts: - uk.bookinfo.com - eu.bookinfo.com tls: mode: SIMPLE serverCertificate: /etc/certs/servercert.pem privateKey: /etc/certs/privatekey.pem - port: number: 9443 name: https-9443 protocol: HTTPS hosts: - "bookinfo-namespace/*.bookinfo.com" tls: mode: SIMPLE credentialName: bookinfo-secret - port: number: 9080 name: http-wildcard protocol: HTTP hosts: - "*" - port: number: 2379 name: mongo protocol: MONGO hosts: - "*"
1 2 3 4 5 6 7 8 9 10 11 12 13 14 15 16 17 18 19 20 21 22 23 24 25 26 27 28 29 30 31 32 33 34 35 apiVersion: networking.istio.io/v1alpha3 kind: VirtualService metadata: name: bookinfo-rule namespace: bookinfo-namespace spec: hosts: - reviews.prod.svc.cluster.local - uk.bookinfo.com - eu.bookinfo.com gateways: - some-config-namespace/my-gateway - mesh http: - match: - headers: cookie: exact: "user=dev-123" route: - destination: port: number: 7777 host: reviews.qa.svc.cluster.local - match: - uri: prefix: /reviews/ route: - destination: port: number: 9080 host: reviews.prod.svc.cluster.local weight: 80 - destination: host: reviews.qa.svc.cluster.local weight: 20
开启网关安全加固 1 2 3 4 5 6 7 8 9 10 11 12 13 14 15 16 17 apiVersion: networking.istio.io/v1alpha3 kind: Gateway metadata: name: my-tls-ingress spec: selector: app: my-tls-ingressgateway servers: - port: number: 443 name: https protocol: HTTPS hosts: - "*" tls: mode: SIMPLE credentialName: tls-cert
遥测(Telemetry V2) 基本 Metrics
针对 HTTP,HTTP/2 和 GRPC 协议,Istio 收集以下指标:
Request Count(istio_requests_total)
Request Duration(istio_requests_duration_milliseconds)
Request Size(istio_request_bytes)
Response Size(istio_response_bytes)
针对 TCP 协议,Istio 收集以下指标:
Tcp Byte Sent(istio_tcp_sent_bytes_total)
Tcp Byte Received(istio_tcp_received_bytes_total)
Tcp Connections Opened(istio_tcp_connections_opened_total)
Tcp Connections Closed(istio_tcp_connections_closed_total)
同时支持 WASM(Web Assembly)plugin 收集数据
多集群网格扩展 多个集群之间的连接模式:
基于 Gateway
每个集群都安装一个 Gateway,通过 Gateway 互相访问。当集群子网不通的时候,可以使用这种方式。
基于 VPN 或可互通的集群
选择一个主集群,作为 Primary 集群,其他集群作为 Remote 集群,Remote 集群只负责 sidecar 和拷贝证书,比较轻量级。官方有全面的教程。
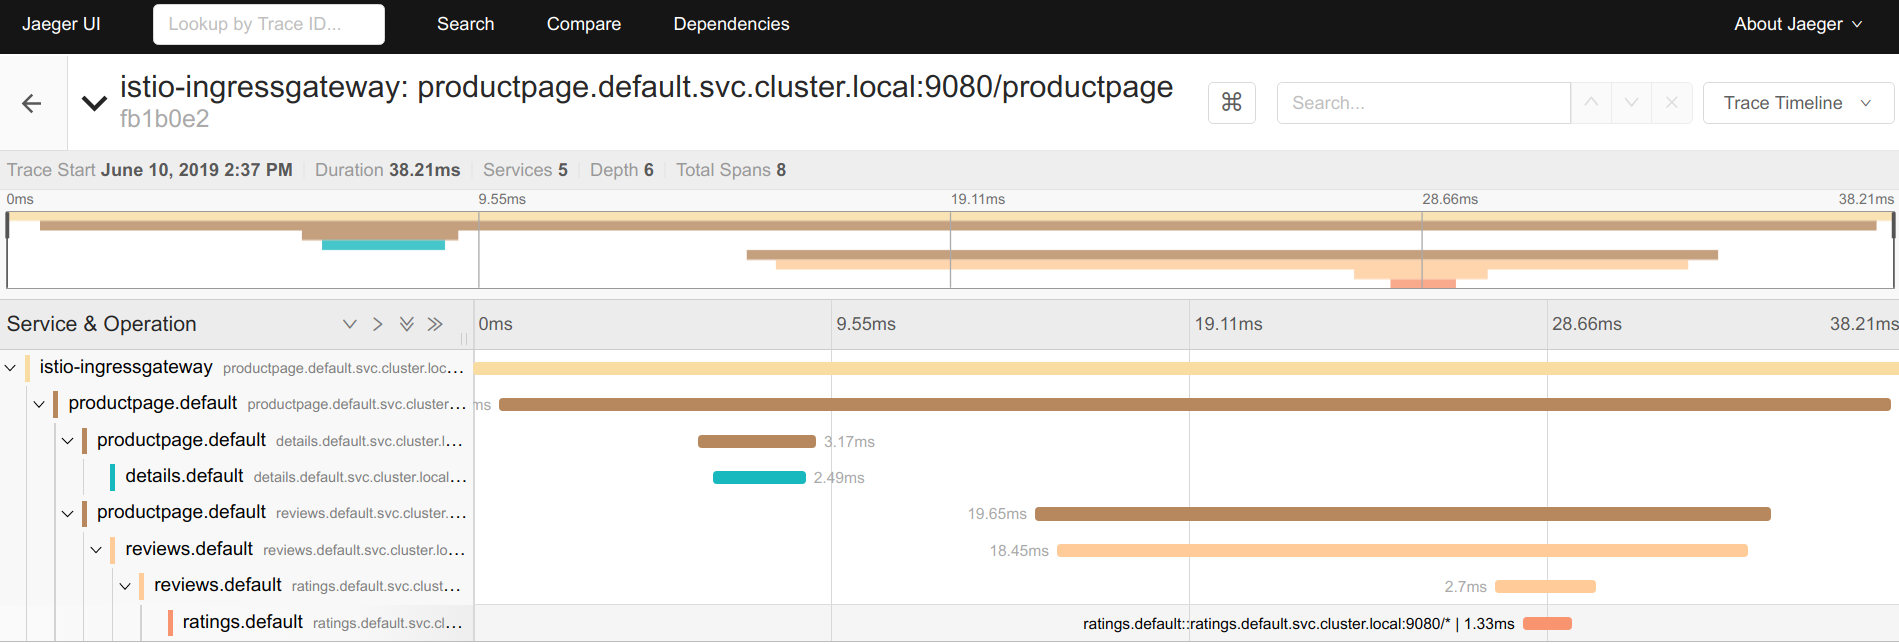
跟踪采样 跟踪采样配置 Istio 默认捕获所有请求的跟踪。例如,何时每次访问时都使用上面的 Bookinfo 示例应用程序/productpage 你在 Jeager 看到了相应的痕迹仪表板。此采样率适用于测试或低流量目。
1 kubectl apply -f https://raw.githubusercontent.com/istio/istio/release-1.20/samples/addons/extras/zipkin.yaml
应用程序埋点 虽然 Istio 代理能够自动发送 Span 信息,但还是需要一些辅助手段来把整个跟踪过程统一起来。
应用程序应该自行传播跟踪相关的 HTTP Header,这样在代理发送 Span 信息的时候,才能正确的把同一个跟踪过程统一起来。
为了完成跟踪的传播过程,应用应该从请求源头中收集下列的 HTTP Header,并传播给外发请求:
x-request-idx-b3-traceidx-b3-spanidx-b3-parentspanidx-b3-sampledx-b3-flagsx-ot-span-context
分布式跟踪
跟踪信息详细视图
Service Mesh 涉及的网络栈
数据每次出去和进来,都要经过多次网络协议栈 netfilter,经过多次 iptables。
Cilium 数据平面加速 https://github.com/cilium/cilium
在高级版本的 Linux 里面 eBPF 比较成熟,其中有个 Cilium 项目,在进入协议栈之前的 hook 点,运行 eBPF 的程序,绕过 netfilter。
总结 微服务架构时当前业界普遍认可的架构模式,容器的封装性,隔离性为微服务架构的兴盛提供了有力的保障。
Kubernetes 作为声明式集群管理系统,代表了分布式系统架构的大方向:
kube-proxy 本身提供了基于 iptables/ipvs 的四层 Service Mesh 方案Istio/linkerd 作为基于 Kubernetes 的七层 Service Mesh 方案,近期会有比较多的生产部署案例。
生产系统需要考虑的,除了 Service Mesh 架构带来的便利性,还需要考虑:
配置一致性检查
endpoint 健康检查海量转发规则情况下的 scalability
References Service Mesh Comparison
Benchmarking Linkerd and Istio: 2021 Redux
[译]Linkerd和Istio基准测试:2021年重复
Istio 文档
Istio Component Ports and Functions in Details
Cilium Service Mesh
cilium