Gitlab的CI

​ 本文介绍通过GitlabCI的整个过程。

环境准备

手动搭建gitlabgitlab-runner

依照官方安装指导手册安装,通过docker的方式,简单方便

安装gitlab

1
2
3
4
5
6
7
8
9
docker run --detach \
--hostname 192.168.41.249 \
--publish 10443:443 --publish 1080:80 --publish 1022:22 \
--name gitlab --restart always \
--volume /home/git/config:/etc/gitlab \
--volume /home/git/logs:/var/log/gitlab \
--volume /home/git/data:/var/opt/gitlab \
--shm-size 256m \
gitlab/gitlab-ee:latest

其中hostnamepublishvolume根据实际情况设置。

修改gitlab的配置文件,由于config目录已经映射到主机上,直接修改主机上的配置即可

1
2
3
4
5
vim /home/git/config/gitlab.rb

external_url 'http://192.168.41.249'
gitlab_rails['gitlab_ssh_host'] = '192.168.41.249'
gitlab_rails['gitlab_shell_ssh_port'] = 1022

由于改动了默认的ssh端口和web端口,在clone推荐目录时,给出来的是默认的IP和端口,而不是上述设置的。因此需要进入到容器中

1
2
3
4
5
6
7
8
9
docker exec -it gitlab bash
vi /opt/gitlab/embedded/service/gitlab-rails/config/gitlab.yml

gitlab:
host: 192.168.41.249
port: 1080
ssh_host: 192.168.41.249
gitlab_shell:
ssh_port: 1022

在容器内,重启服务

1
2
gitlab-ctl reconfigure
gitlab-ctl restart

安装Runner

安装gitlab-runner

1
2
3
4
5
6
docker run -d --name gitlab-runner \
--restart always \
--network host \
-v /srv/gitlab-runner/config:/etc/gitlab-runner \
-v /var/run/docker.sock:/var/run/docker.sock \
gitlab/gitlab-runner:latest

volume根据具体情况设置。

Runner注册

Runner使用docker的执行器,可以将需要的环境打包成一个镜像,例如固定golang版本,提前准备需要的工具。

准备镜像

Dockerfile

1
2
3
4
5
6
7
8
9
10
11
12
13
14
15
16
17
# Base image: https://hub.docker.com/_/golang/
FROM golang:1.19.6
USER root
ENV GOPROXY https://goproxy.cn,direct

# install golangci-lint
RUN go install github.com/golangci/golangci-lint/cmd/[email protected]

# install docker
RUN curl -O https://get.docker.com/builds/Linux/x86_64/docker-latest.tgz \
&& tar zxvf docker-latest.tgz \
&& cp docker/docker /usr/local/bin/ \
&& rm -rf docker docker-latest.tgz

# install expect
RUN apt-get update
RUN apt-get -y install tcl tk expect

golangci-lint的版本下载链接需要及时与官网对齐,golangci-lint的官网:https://golangci-lint.run/usage/install/#local-installation

构建镜像

1
docker build -t go-tools:1.19.6 .

例如使用golang 1.19.6版本,通过golintgolangci-lint检查代码。

安装docker是由于需要再容器中使用宿主的Docker命令,因此需要安装Docker,将宿主机的docker.sock文件挂载到容器内的相同位置。

生成镜像后,推送到镜像仓,并在gitlab-runner的服务器上拉取改镜像。

注册runner,直接执行

1
docker exec -it gitlab-runner gitlab-ci-multi-runner register

在gitlab的项目-设置-CI/CD-Runner中,可以看到注册Runner的网址和注册令牌。

按照提示输入相关信息

1
2
3
4
5
6
7
8
9
10
11
12
13
14
Please enter the gitlab-ci coordinator URL:
# gitlab的url, gitlab->你的项目->settings -> CI/CD ->Runners settings
Please enter the gitlab-ci token for this runner:
# gitlab->你的项目->settings -> CI/CD ->Runners settings
Please enter the gitlab-ci description for this runner:
# 示例:mitaka-runner1
Please enter the gitlab-ci tags for this runner (comma separated):
# 示例:golang
Whether to run untagged builds [true/false]:
# true // 可以运行不加tag的builds
Please enter the executor: docker, parallels, shell, kubernetes, docker-ssh, ssh, virtualbox, docker+machine, docker-ssh+machine:
# docker // 使用容器
Please enter the default Docker image (e.g. ruby:2.1):
# go-tools:1.19.6(之前自己制作的镜像)

注册之后,在Runner管理页面上就可以看到正在运行的Runner

runner配置之后,在配置文件中可以看到runner的配置信息,还需要对配置信息做部分修改。

安装runner时,已经将runner的配置目录映射到主机/srv/gitlab-runner/config,因此,修改对应文件即可

1
vim /srv/gitlab-runner/config/config.toml
1
2
3
4
5
6
7
8
9
10
11
12
13
14
15
16
17
18
19
20
21
22
[[runners]]
name = "mitaka-runner1"
url = "http://192.168.41.249:1080/"
token = "7ZSiyUZya9z7zF-fUuxz"
executor = "docker"
[runners.custom_build_dir]
[runners.cache]
[runners.cache.s3]
[runners.cache.gcs]
[runners.cache.azure]
[runners.docker]
tls_verify = false
image = "go-tools:1.19.6"
privileged = false
disable_entrypoint_overwrite = false
oom_kill_disable = false
disable_cache = false
volumes = ["/var/run/docker.sock:/var/run/docker.sock"] // 挂载卷
shm_size = 0
extra_hosts = ["192.168.41.249:127.0.0.1"] // 网络映射,将gitlab主机映射成127.0.0.1
network_mode = "host" // 主机网络模式
pull_policy = "if-not-present" // 镜像不存在,则拉取

gitlan-runner在执行时,会根据配置启动一个容器,在这个容器中pull代码,并根据规则检测。

配置文件修改之后,重启runner

1
gitlab-runner restart

配置ci

在代码线中,配置.gitlab-ci.yml

1
2
3
4
5
6
7
8
9
10
11
12
13
14
15
16
17
18
19
20
21
22
23
24
25
26
27
28
29
30
31
32
33
34
35
36
37
38
39
40
41
42
43
44
45
46
47
48
49
50
51
52
53
54
55
56
57
58
59
60
61
62
63
64
65
66
67
68
image: go-tools:1.19.6

stages:
- build
- test
- deploy

before_script:
- export VERSION=`echo ${CI_COMMIT_TAG} | awk -F"_" '{print $1}'`

# 单元测试
unit_tests:
stage: test
script:
- make test
tags:
- golang

# 竞态检测
race_detector:
stage: test
script:
- make race
tags:
- golang

# 代码覆盖率检测
code_coverage:
stage: test
script:
- make coverage
tags:
- golang

# 代码覆盖率导出成html
code_coverage_report:
stage: test
script:
- make coverhtml
only:
- master
tags:
- golang

# golangci-lint代码检测
golangci-lint_code:
stage: test
script:
- make golangci-lint
tags:
- golang

# go build检测
build:
stage: build
script:
- pwd
- go build .
tags:
- golang

# 制作docker镜像
build_image:
stage: deploy
script:
- make build_image
tags:
- golang

ci中包括了执行单元测试、竞态检测、代码覆盖率、lint检测、golangci-lint检测、go build检测。

为了降低ci文件中的复杂度,将过程单元化,放到Makefile中,使用统一的方式调用它们。

Makefile

1
2
3
4
5
6
7
8
9
10
11
12
13
14
15
16
17
18
19
20
21
PROJECT_NAME := "demo"
PKG_LIST := $(shell go list ./... | grep -v /vendor/)
GO_FILES := $(shell find . -name '*.go' | grep -v /vendor/ | grep -v _test.go)

test: ## Run unittests
@go test -v ${PKG_LIST}

golangci-lint: ## golangci-lint files
@golangci-lint run ./...

race: ## Run data race detector
@go test -race -short ${PKG_LIST}

coverage: ## Generate global code coverage report
./scripts/coverage.sh;

coverhtml: ## Generate global code coverage report in HTML
./scripts/coverage.sh html;

build_image: ## Generate docker image
./build_images.sh

检查代码覆盖率的脚本

./scripts/coverage.sh

1
2
3
4
5
6
7
8
9
10
11
12
13
14
15
16
17
18
19
20
21
22
#!/bin/bash
#
# Code coverage generation
COVERAGE_DIR="${COVERAGE_DIR:-coverage}"
PKG_LIST=$(go list ./... | grep -v /vendor/)
# Create the coverage files directory
mkdir -p "$COVERAGE_DIR"
# Create a coverage file for each package
for package in ${PKG_LIST}; do
go test -covermode=count -coverprofile "${COVERAGE_DIR}/${package##*/}.cov" "$package"
done
# Merge the coverage profile files
echo 'mode: count' >"${COVERAGE_DIR}"/coverage.cov
tail -q -n +2 "${COVERAGE_DIR}"/*.cov >>"${COVERAGE_DIR}"/coverage.cov
# Display the global code coverage
go tool cover -func="${COVERAGE_DIR}"/coverage.cov
# If needed, generate HTML report
if [ "$1" == "html" ]; then
go tool cover -html="${COVERAGE_DIR}"/coverage.cov -o coverage.html
fi
# Remove the coverage files directory
rm -rf "$COVERAGE_DIR"

该代码线在git push之后,会自动执行流水线

./build_images.sh制作镜像的脚本根据实际项目而定,主要逻辑是通过脚本执行Dockerfile,脚本负责指定tag以及将image push到镜像仓。

Ps:后续自动更新到生产环境,也是通过脚本实现,当然也有更好的云原生方案,封装API等,可以根据实际环境实现。

流水线

image-20220808165900505

image-20220808165922917

点击具体的作业,可以查看详细输出。

image-20220808170038028

机器人通知

钉钉或者企业微信都可以配置群机器人,通过群机器人web-hook的地址,可以发送部署信息。

Ps:通过web-hook也可以实现通知,根据具体接口参数二次开发,这里仅介绍通过脚本发送http请求通知群聊机器人。

参考文本信息

1
2
3
4
5
6
7
8
9
curl 'https://qyapi.weixin.qq.com/cgi-bin/webhook/send?key=693axxx6-7aoc-4bc4-97a0-0ec2sifa5aaa' \
-H 'Content-Type: application/json' \
-d '
{
"msgtype": "text",
"text": {
"content": "hello world"
}
}'

实际配置如下

scripts/notice.sh

1
2
3
4
5
6
7
8
9
10
11
12
13
14
15
16
gVersion=2.0
GIT_SHA=$(git rev-parse --short HEAD)
BUILD_NUMBER=$(git log | grep -e 'commit [a-zA-Z0-9]*' | wc -l)

VERSION=v${gVersion}.r${GIT_SHA}-${BUILD_NUMBER}

cmd=$(curl -X POST 'https://qyapi.weixin.qq.com/cgi-bin/webhook/send?key=a48cb0d0-5653-4dae-ac41-de047df0fa8f' \
-H 'Content-Type: application/json' \
-d "
{
\"msgtype\": \"text\",
\"text\": {
\"content\": \"${VERSION}\", // 仅发送tag号
\"mentioned_list\":[\"@all\"] // 通知所有人
}
}")

添加makefile

1
2
notice:
./scripts/notice.sh;

增加ci

1
2
3
4
5
6
7
# 通知
notice:
stage: notice // 增加一个stage,成功之后通知。
script:
- make notice
tags:
- golang

注意:执行的脚本需要注意一定要有可执行权限

ps:通知功能可以直接运行脚本先经过测试,能够发送之后再加入到ci中。

补充

本文简单介绍CI的过程,其中有很多可优化的点,例如:

  • CI中的每个板块都要重新启动一个容器,启动容器必然会拉取代码,这个过程可以简化
  • 消息通知只做了所有过程成功才发起,这个过程可以细化到其他的过程,失败之后也通知,并且通知报错

优化配置

并行个数

调整任务并行个数,某些情况下可以加速执行。

1
2
3
# cat config.toml
concurrent = 1
check_interval = 0

concurrent代表1个runner,可以同时执行相同stage的个数。

image-20230301113703324

例如当Test有四个任务时,将concurrent改为4,一个runnger,可以同时执行这四个任务。

禁止数据覆盖

猜测:禁止数据覆盖可以确保并发执行的时候,不会对cache同时操作,导致其他的任务出错的可能。(测试不多,但是有用)

1
2
3
4
5
6
7
8
9
10
11
12
13
14
15
16
17
18
19
20
21
22
[[runners]]
name = "runner-01"
url = "http://192.168.50.2/"
token = "xWgzycoX_m4fnhAfoZzX"
executor = "docker"
[runners.custom_build_dir]
[runners.cache]
[runners.cache.s3]
[runners.cache.gcs]
[runners.cache.azure]
[runners.docker]
tls_verify = false
image = "go-tools:1.19.6"
privileged = false
disable_entrypoint_overwrite = true
oom_kill_disable = false
disable_cache = false
volumes = ["/cache", "/var/run/docker.sock:/var/run/docker.sock"]
extra_hosts = ["192.168.51.2:127.0.0.1"]
network_mode = "host"
pull_policy = ["if-not-present"]
shm_size = 0

disable_entrypoint_overwrite字段改为true

golang使用cache

使用cache,避免每次执行任务,都需要执行go download下载包

1
2
3
4
5
6
7
8
9
10
11
12
13
14
15
16
17
18
19
20
21
22
23
24
25
26
27
28
29
30
31
32
33
34
35
36
37
38
39
40
41
42
43
44
45
46
47
48
49
50
51
52
53
54
55
56
57
58
59
60
61
62
63
64
65
66
67
68
69
70
71
72
73
74
75
76
77
78
79
80
81
82
83
84
85
86
87
88
89
90
91
92
93
94
95
96
97
98
99
100
101
102
103
image: go-tools:1.19.6

stages:
- build
- test
- notice

before_script:
- export VERSION=`echo ${CI_COMMIT_TAG} | awk -F"_" '{print $1}'`

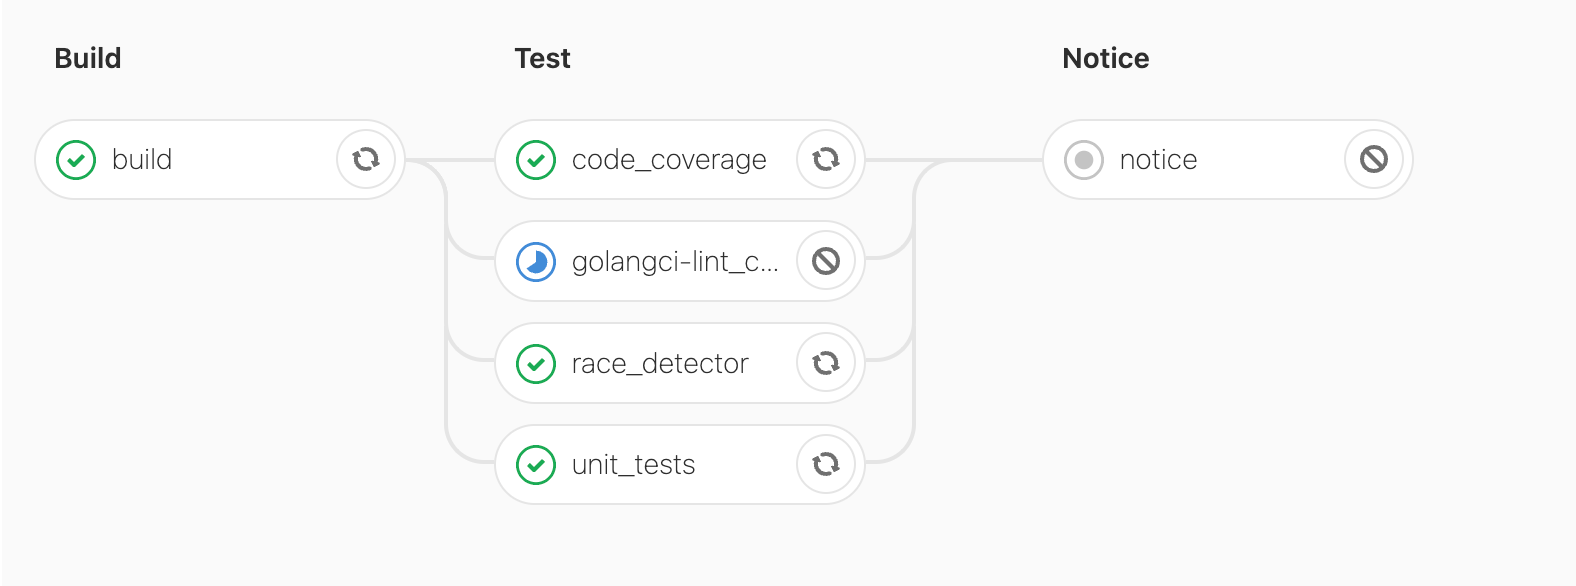
# go build检测
build:
stage: build
script:
- go env -w GOMODCACHE=$(pwd)/.mod_cache/ GOPROXY=https://goproxy.cn,direct
- go mod tidy
- make build
cache:
key: $(md5sum go.mod)
paths:
- .mod_cache/
tags:
- golang

# 单元测试
unit_tests:
stage: test
script:
- go env -w GOMODCACHE=$(pwd)/.mod_cache/ GOPROXY=https://goproxy.cn,direct
- go mod tidy
- make test
cache:
key: $(md5sum go.mod)
paths:
- .mod_cache/
tags:
- golang

# 竞态检测
race_detector:
stage: test
script:
- go env -w GOMODCACHE=$(pwd)/.mod_cache/ GOPROXY=https://goproxy.cn,direct
- go mod tidy
- make race
cache:
key: $(md5sum go.mod)
paths:
- .mod_cache/
tags:
- golang

# 代码覆盖率检测
code_coverage:
stage: test
script:
- go env -w GOMODCACHE=$(pwd)/.mod_cache/ GOPROXY=https://goproxy.cn,direct
- go mod tidy
- make coverage
cache:
key: $(md5sum go.mod)
paths:
- .mod_cache/
tags:
- golang

# 代码覆盖率导出成html
code_coverage_report:
stage: test
script:
- go env -w GOMODCACHE=$(pwd)/.mod_cache/ GOPROXY=https://goproxy.cn,direct
- go mod tidy
- make coverhtml
cache:
key: $(md5sum go.mod)
paths:
- .mod_cache/
only:
- master
tags:
- golang

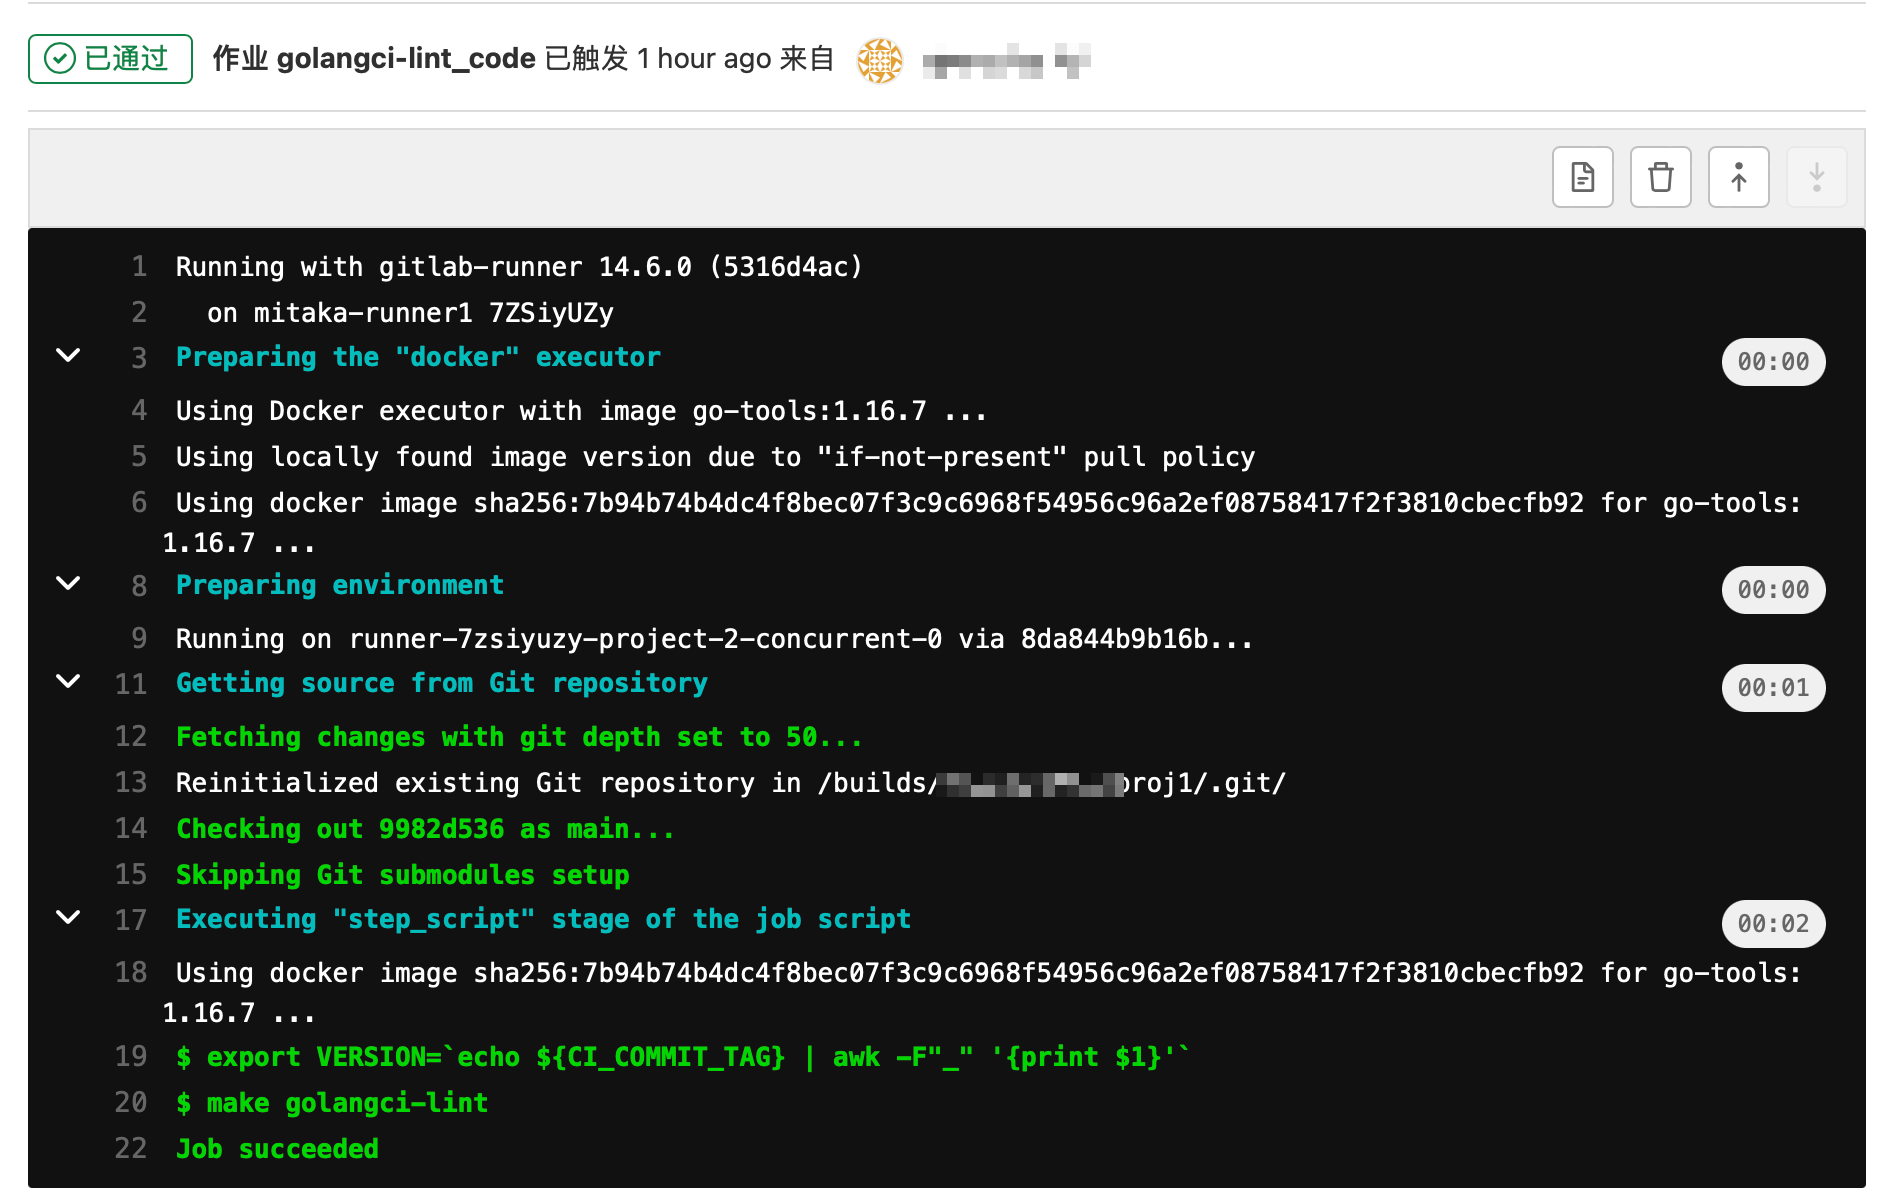
# golangci-lint代码检测
golangci-lint_code:
stage: test
script:
- go env -w GOMODCACHE=$(pwd)/.mod_cache/ GOPROXY=https://goproxy.cn,direct
- go mod tidy
- make golangci-lint
cache:
key: $(md5sum go.mod)
paths:
- .mod_cache/
tags:
- golang

# 通知
notice:
stage: notice
script:
- make notice
tags:
- golang

推荐阅读:

Go项目Gitlab CICD提速指南